![]()
Throughout this article are all the tips, tricks, and unique ways for you and 1.4 other billion users to use Apple Calendar. You can change up how your calendar looks, keep your friends and family up to date, have more than just one account and personalize your calendar to something that fits you best. Move from one device to the other without having to worry about making any changes, everything will sync for you. With Apple Calendar, you aren’t just staying on track, you are always one step ahead.
Let’s Begin
The Apple Calendar icon is where you will always go to access your calendar, which you can typically find on your Mac dock. The first clever feature of your Apple Calendar is that the app icon itself will always change to match the date of the current day. Once the app opens, you will automatically be shown an entire view of the current month. However, you always have the option to change up how it looks.
Change up Your View
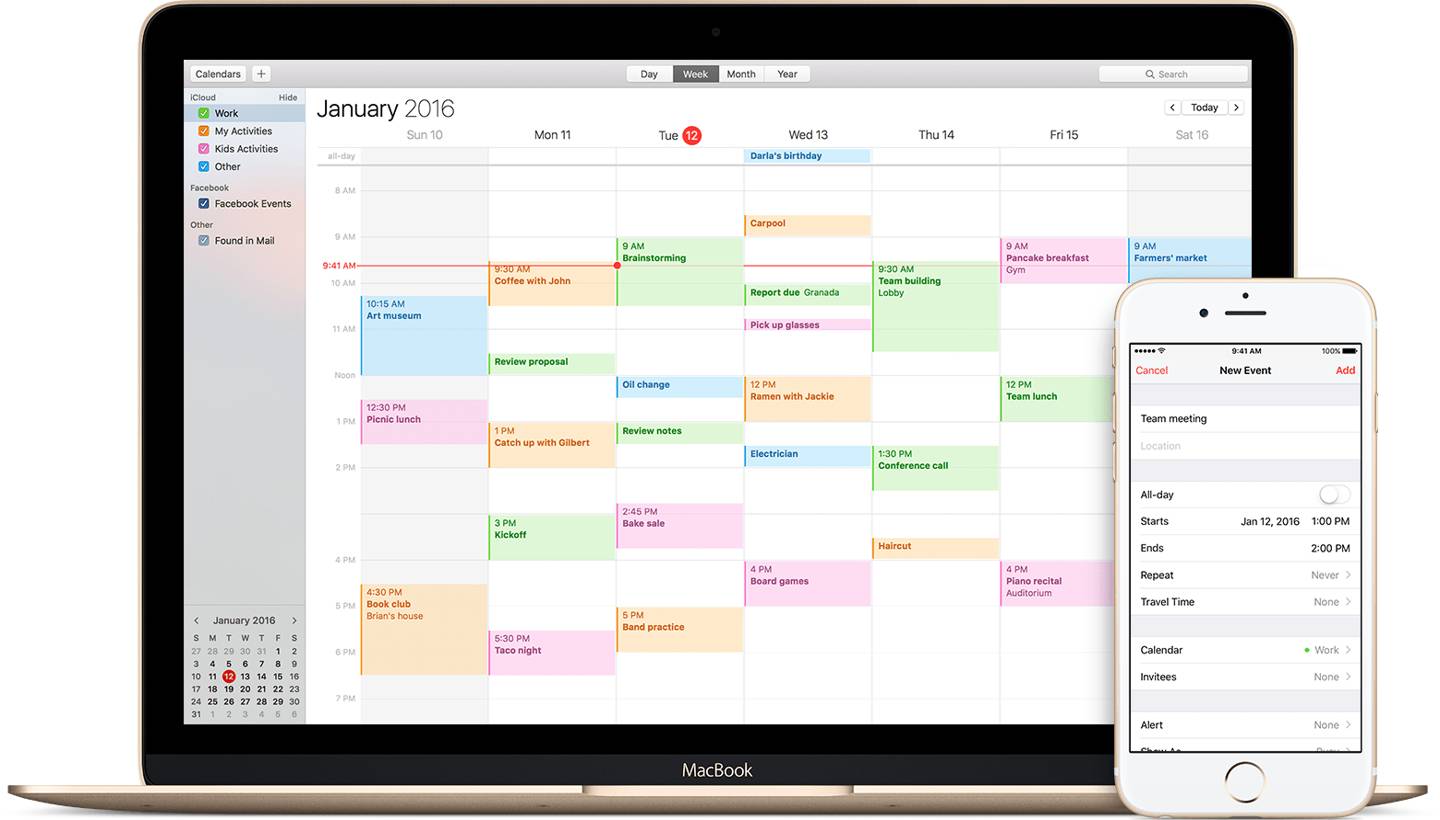
Sticking to the same view can get old. You have four ways to view your calendar, by the Day, Week, Month or Year. You are able to change it up any way you like by simply clicking on one of those options at the top of your calendar page like so:
Know Your Preferences
Your Preferences is going to be the place where you go for almost everything. Whether you have questions, want to try something new or make changes, this is the place you are going to go. Don’t forget where it is! You’ll be going through these few steps quite a few times:
- Go to the top right corner of your screen
- Click on Calendar
- Select Preferences

You’ll get a pop-up of all your settings. The first page, labeled General, is where you can change specific settings about your calendar to your liking.
All the Settings
These four pages, General, Accounts, Alerts, and Advanced is going to be your home away from home. You will get to know these preferences so you learn what fits best to your liking. Your General Settings is where you will be referring to the most to change up things in your calendar.
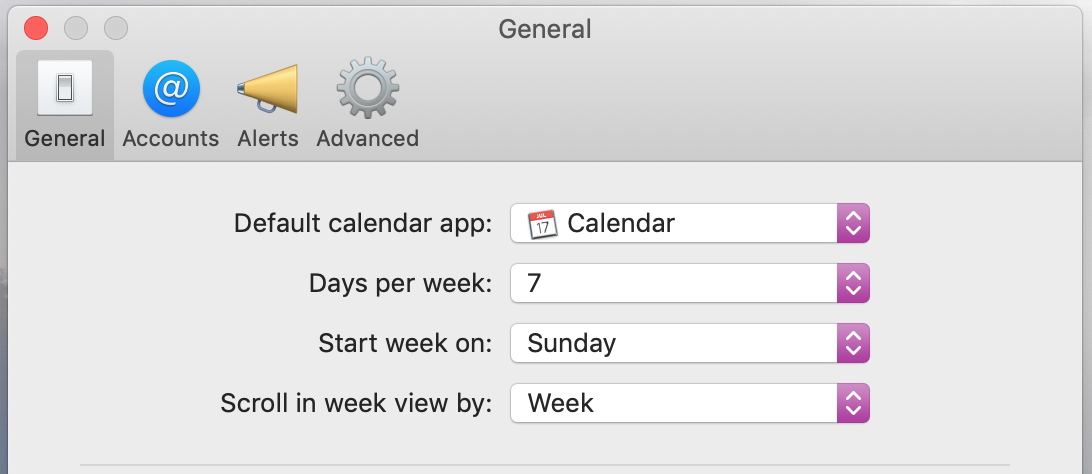
Each subsetting in on this page has its own functions. Here’s what they do.
Default Calendar App
Believe it or not, you have the option to use a different calendar app as your default. You can change this to Microsoft Outlook, Google Calendar, Any.do, etc. Change it as much as you want, but the default as Calendar will work best since it’s most compatible.
Days Per Week
How many days do you want to work during the week? One or two days would be nice. But, you can’t fool Apple Calendar. It offers you two options for your week display: five or seven days. Usually, seven is a good choice so you can plan for more fun activities for the weekends.
Starting Your Weeks
Apple decided to go all out so you can start your week on any day. It will default to starting your week on Sunday, but if you want to change it, click the drop-down menu to see your choices. You can go crazy and have your weeks start on Wednesday, maybe it will make them feel a little shorter.
Scrolling View
This is a special setting you can alter. Who knew you could change how much of the calendar goes by as you are scrolling in week view. Apple sets it to a week at first, but you can easily change that to Day or Week, Stop on Today.
Start and End Your Days
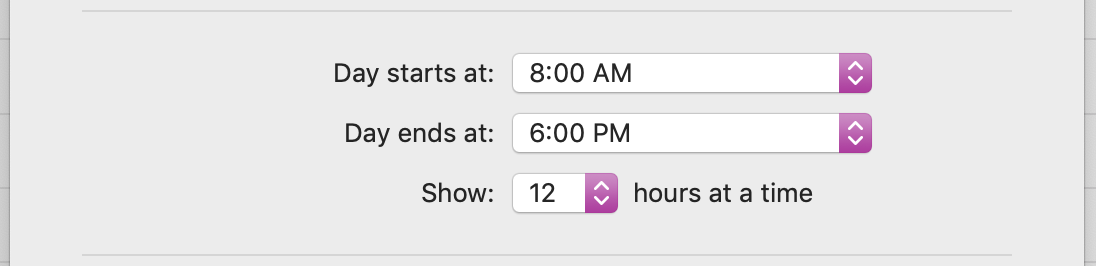
This is where you are going to change up when you begin your days and when they come to a close. There are no limits! Go crazy and start your day at 3:00PM if you’d like (but hopefully, you’re out of bed before that). Choose to show six hours at a time and your hours will be more spread apart throughout the day. Don’t worry, those hours didn’t just disappear. You can still scroll down to see the remaining hours for your day.
Your Default Calendar
Don’t get this confused with the default calendar app, they are different!
Most of us have to manage multiple schedules, like work, school, family, social life, etc. These are also known as “calendars.” Your Default Calendar can be set to any of those calendars and from there is where you can create events, share them with others and even groups of people. Choose your work calendar as your default, and the events you create will automatically be set under that calendar, but you can always change this once you create the event!

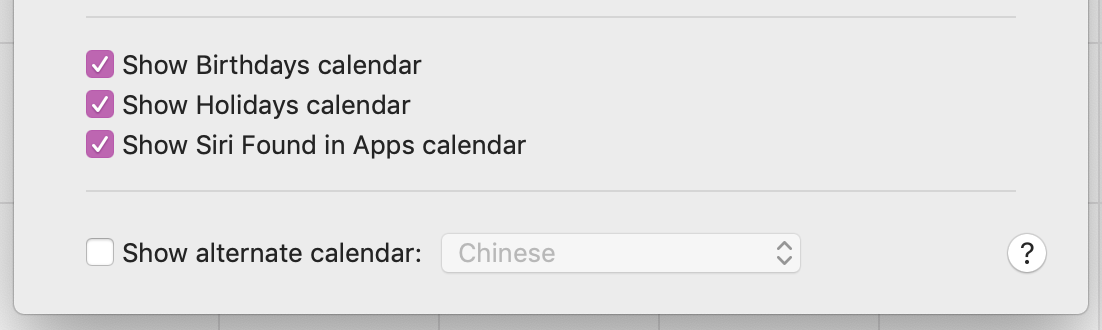
Select other calendars to have on display like birthdays, holidays, and things your friend Siri finds for you. Too crowded? Just uncheck the boxes!
Create from Scratch
We showed you how to set your default calendar and if you don’t already use a different calendar platform, you’re all set. But, we know you probably got rid of your pens and paper a while ago and have been using a different platform like Google or Outlook Calendar.
Adding Accounts
You’re going to be doing this from your preferences on the Accounts Tab.
- Click on the plus button at the bottom
- Choose your account provider and enter in your information from there
Once you’re logged in, Apple Calendar will pull up a menu for you to choose what your Apple Calendar can access. Uncheck or check as much as you please, but make sure you check the box for Calendars.
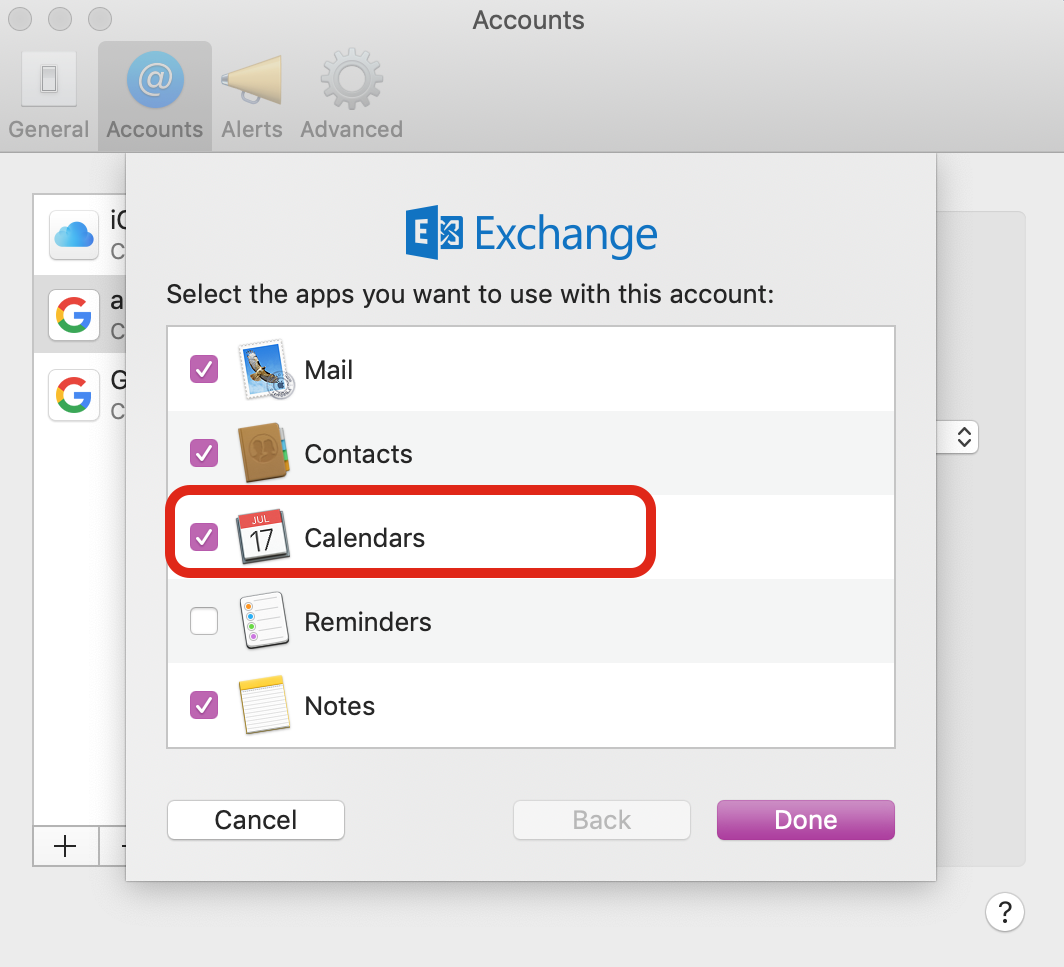
Press Done and everything from your original calendar will now appear on your Apple Calendar. Having fun? Go ahead and do this as many times as you want with any calendars you want to add.
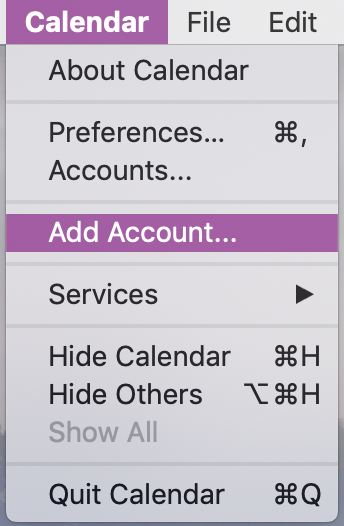
Shortcut time!
- Go to the top of your screen
- Click on Calendar
- Select Add Account
- Repeat the same steps from before
Creating Your Own Calendar
It’s time to make your own calendars, your way. As we mentioned before, lots of us have to keep track of just more than one schedule. So, we’re going to teach you how to create separate calendars to make organizing your life just that much better. Create a new calendar: share with friends, keep other things private and fill your calendar with color.
- Go to the top right corner of your screen
- Click File
- Select New Calendar
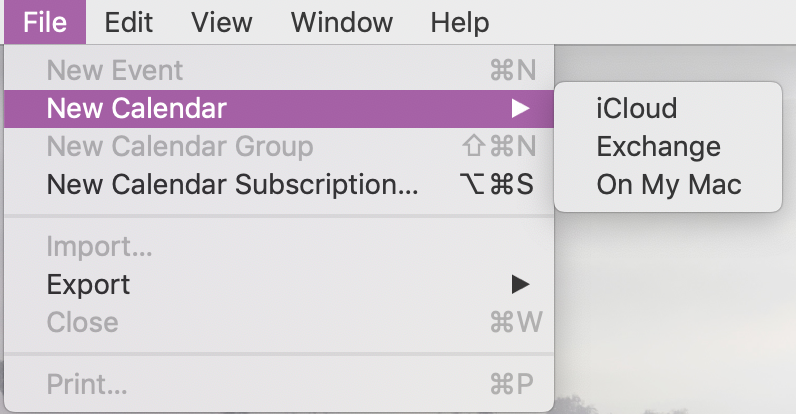
If you already have more than one calendar account, choose where you want the new calendar to be placed otherwise you can just use On My Mac. If you try to add a calendar to a Google account it won’t work.
To add a calendar from Google…
- Go to calendar.google.com (log in if you aren’t already)
- Add your new calendar from there
- Export your calendar to your computer
- Import that calendar data to your Apple Calendar
Apple makes this a lot easier when you add calendars from Mac or iCloud accounts. After you choose to add a new calendar, it will pop up on the left side of your calendar.
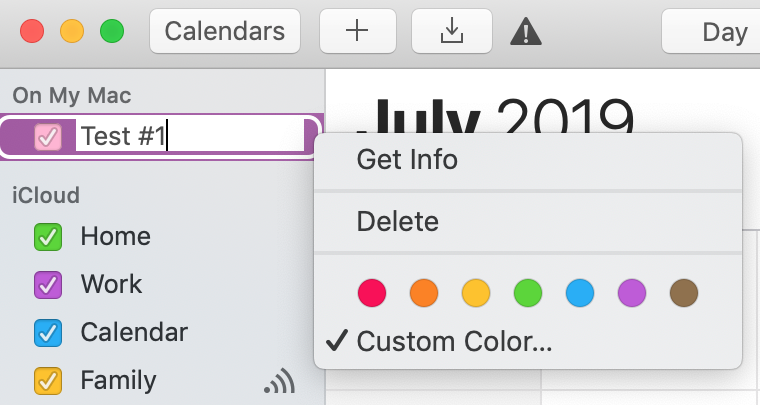
- Name your calendar
- Right-click to pick a different color
Now you can add as many new calendars as you’d like whether it’s to keep track of things big or small from your work schedule to call your grandma.
Deleting Your Calendar
- Head to your list of calendars on the left side
- Right-click the calendar you want to delete
- Press Delete.
Note: When you delete a calendar, you lose all of its events. Doing these same steps will also give you the option to edit your calendar. Of course, there’s a catch: some calendars you actually can’t delete. If you have delegated access to a certain account you will need to remove it first.
- Head back to your Preferences and then to Accounts.
- Click on the account you would like to get rid of (you’ll see Account Information and Delegation)
- Select Delegation
- Click Edit
- Click the people who you’re sharing your calendar with
- Press the minus button “–” at the bottom of the page
Now, you can go back and actually delete that calendar. Just so we’re on the same page, let’s talk about the difference between sharing and delegating your calendar.
- Delegating your calendar means you’re giving people access to your calendar and they can create events on your behalf.
- Sharing your calendar means they can only see your schedule.
Delegating Your Calendar
Delegating your calendar is actually really useful. There will be times when you are unable to access your calendar and you need someone to make a last-minute change for you right from your calendar. Let’s say you’re at work with back-to-back meetings. You accidentally forget to schedule a lunch meeting for the afternoon. Luckily, one of your colleagues, friends or whoever can do that for you.
- Go back to your Preferences
- Go to the Accounts page
- Click on the account you want to delegate and you’ll
- Click on Delegation
- Hit Edit and click the plus button “+” to add people
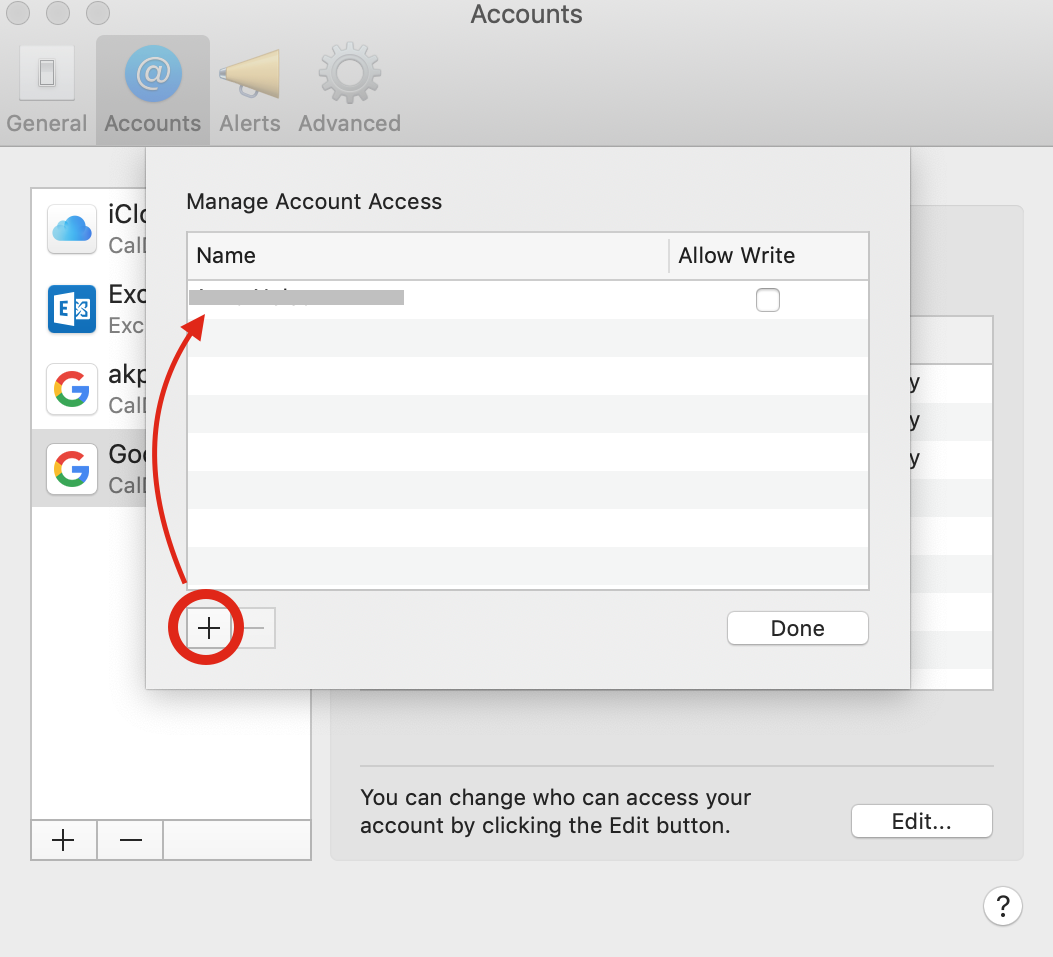
- Type in who you want to delegate your calendar to
- Select them from your contact list (it will show up as you type)
Note: What they are able to do with your calendar depends on the nature of your account. If the person you’re sharing it with has a CalDAV account, click on Allow Write so they can create events straight from your calendar. If it’s an Exchange account, you can choose to give the person different levels of access to your calendar.
Sharing Your Calendar
Remember that sharing your calendar only lets people view your calendar. Here’s how to do it.
- Press the sharing icon next to your calendar of choice
- Type in the names of people you want to share with
- Click the drop-down arrow to adjust their access to your calendar (your two options are View Only or View & Edit)
- Press done
If you’re dying to make your calendar Public to everyone, check the box next to Public Calendar and you’ll get a link that anyone can access. And we mean anyone. Unless you want everyone knowing about your Tinder dinner dates and your grandma’s birthday party, you probably won’t want to make your calendar entirely public.
Subscribing to Calendars
You can import calendars, create your own, and share them. What else can you do? You can subscribe to any calendar you want. Think of something that interests you, and you can probably find a calendar for it like sports, holidays, TV shows, phases of the moon and the NASA Launch Schedule.
Here’s a tip: some really good websites with tons of calendars are iCalShare or CalendarLabs.
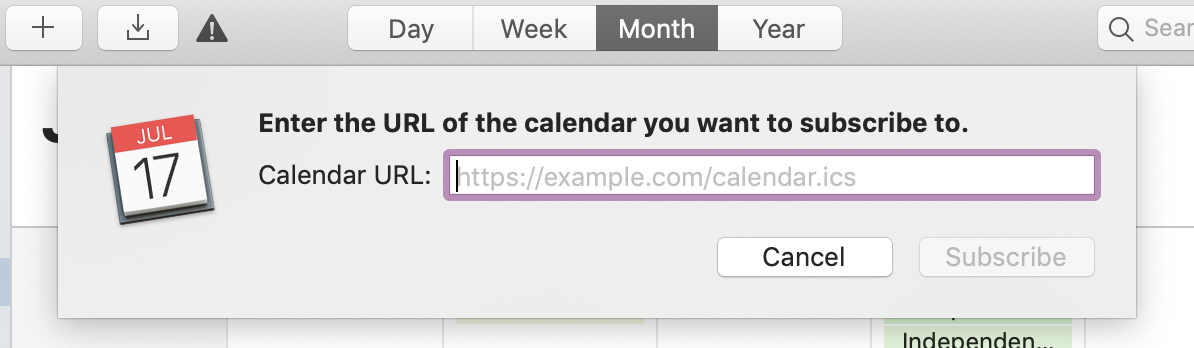
- Head to File
- Select New Subscription
- Paste your URL in the pop-up field
Remind Yourself
Don’t forget to remind yourself! As you may have seen already, the third tab in your preferences is a page labeled Alerts. These alerts are like your notifications and make sure you don’t have an excuse to skip your workout class or even forget your best friend’s birthday.
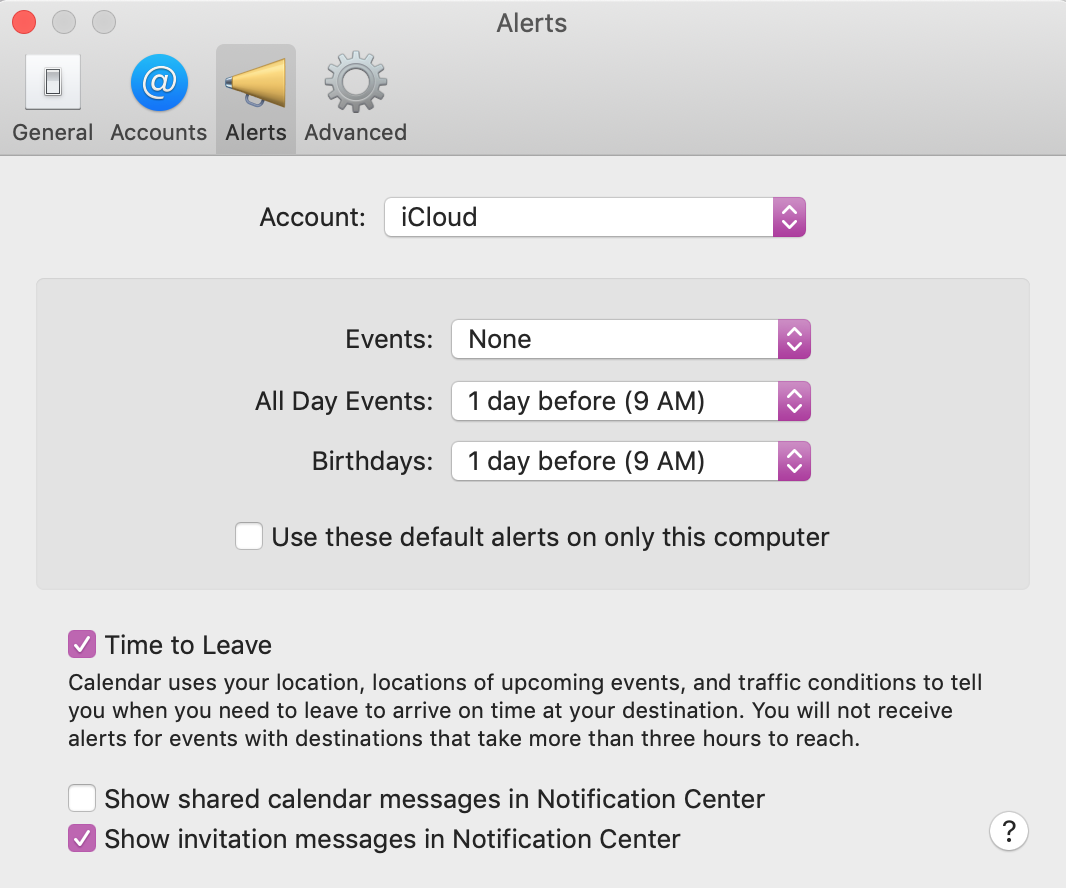
First, choose the account you what to set event alerts for. Apple gives you choices based on what calendars you use like Google, iCloud, Outlook, etc.
Apple Calendar got smart and knows you may not want the same type of alert for different events. For each option: Events, All Day Events, and Birthdays, you can change the type of alert you receive. Click the drop-down arrow and you’ll be given tons of options ranging from five minutes to two days before the event. Check Time to Leave so Apple Calendar can let you know the best time to leave your house to get to your destination on time!
Get Advanced
Last but not least, is your Advanced tab. It may sound complicated, but it’s actually fairly simlple.
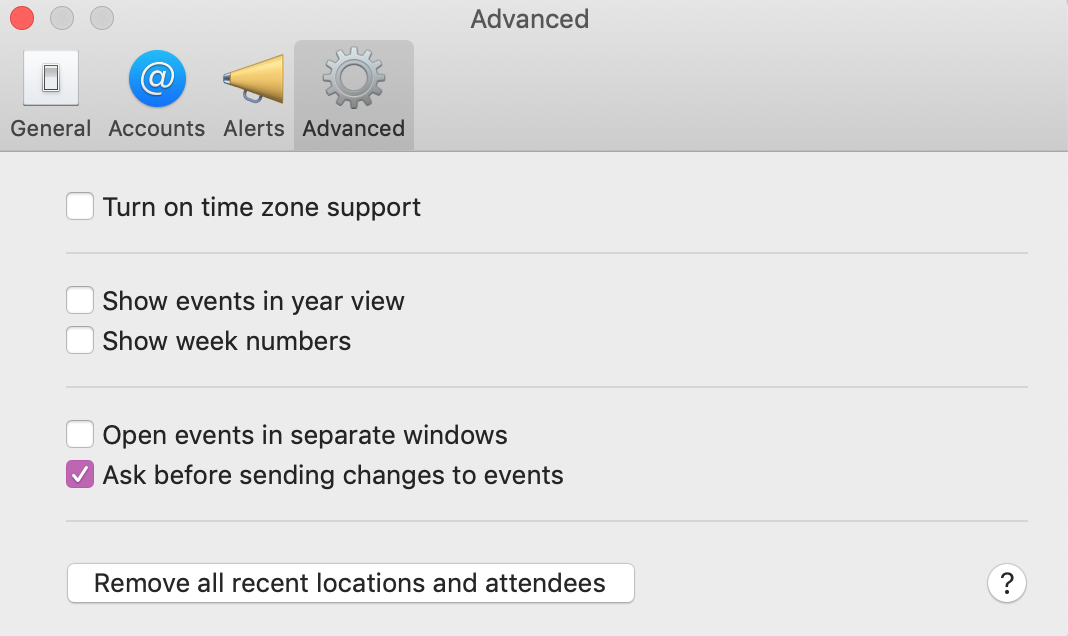
You can turn on Time zone support that is a very helpful tool for scheduling events with people outside of your local time zone. If you are scheduling a Skype meeting, everyone around the world will be able to see the event as their local time zone so there is no confusion.
Check the box for show events in year view and you’ll see them all. However, this can be a bit hard to read, even if you don’t need reading glasses. You can also show week numbers, which is nice if you are counting down for something or you just want to know what week it is during the year.
The next options you have are a bit more important. You can choose to open events in separate windows and ask before sending changes to events. Even if you open events in separate windows, you still won’t lose the view of the calendar.
Enough talk about reminding and changing events. Let’s get to what you’ve been waiting for.
Creating Events
It’s time to show you what this calendar is made for: creating events. Apple has a fun trick called Quick Event. We predict it will be very helpful to you in your near future.
Creating Quick Events
- Click the plus button at the top right corner of your calendar page
- Type in your event and the time
- Press Enter
- Type in the details for your event in the pop-up window
- Choose a location, change the time if you need to, add alerts, invite people and add notes!
Here comes the clever part. After you’ve invited two people, Apple will start to suggest people to invite based on your previous behaviors for inviting people. If you’re usually inviting the same people to your work meetings, Apple Calendar can do that for you!
Checking Availability
Inviting people to your party is fun. But, it won’t be fun if no one shows up, that usually means they are busy or let’s face it – they are ignoring you. Either way, you should check to see if they are available to pick the best time for everyone.
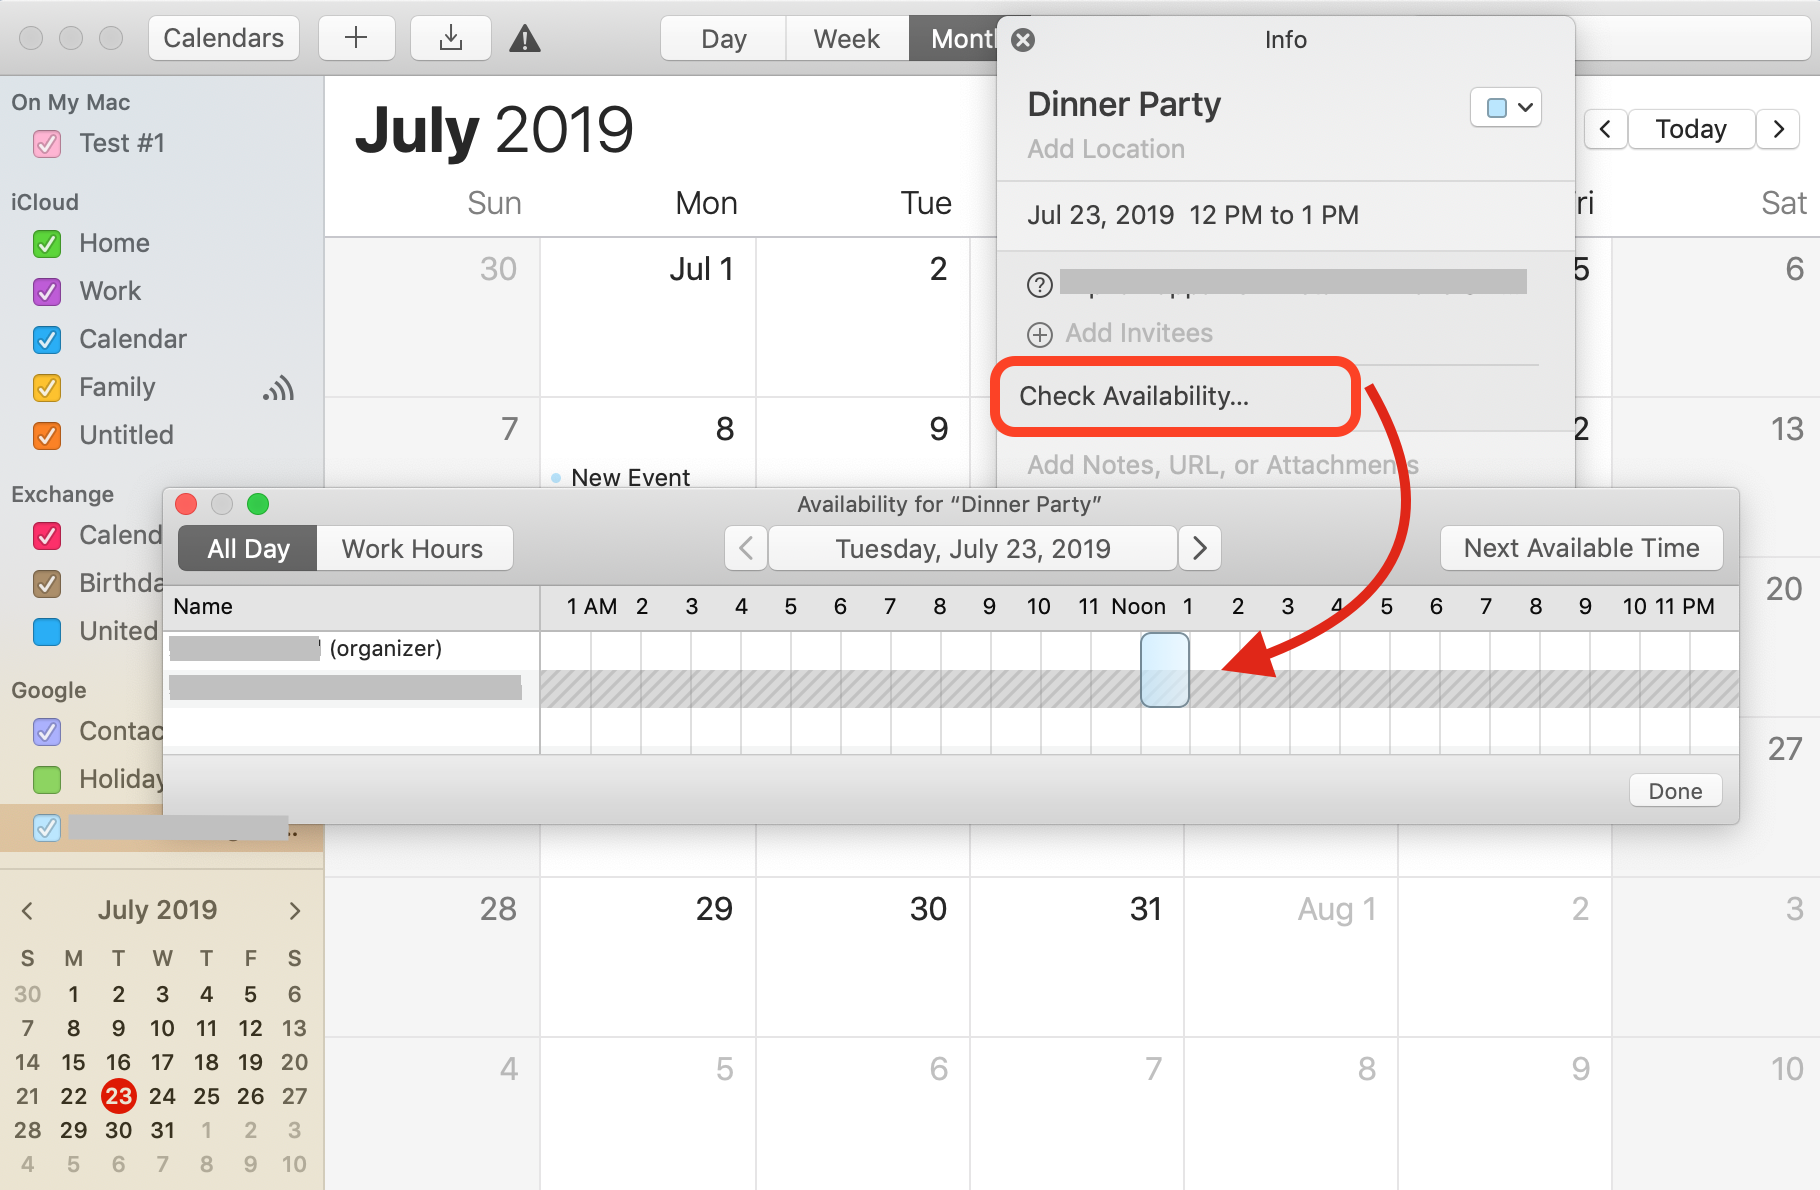
As long as you’re both sharing your calendar, a button labeled Check Availability will show up after you’ve invited them.
- Click on Check Availability (a pop-up window will appear)
- Move the event by clicking and dragging the event
- Click Next Available Time to see the next time they’re free
Invitation Status
So you invite people, but who’s actually coming? Next to the list of your invitees are icons: a green checkmark, a red “X”, or a “?”. Here’s what those symbols mean:
- A green checkmark means they are coming
- A red “X” means they aren’t coming
- A question mark “?” means they still need to RSVP or there was a problem with the invitation
Adding Notes, Links and Attachments
As you may have seen while you were inviting people to your party, there are options to add notes, links, and attachments. Let’s say you create an event for a dinner party, writing down some notes for others to see can be helpful so they can prepare beforehand. This is a very useful tool for events you want people to prepare for beforehand or simply just have more information about. You can add digital invitations, documents, powerpoints, schedules, etc.
Having Some Troubles? We’ve Got You.
As amazing as it is we have to face the truth, not everything is perfect, even Apple. We’re going to quickly go through some common problems you may come across and then give you some easy solutions.
I Can’t Edit Events Or Calendars.
Here is what may have happened…
- Someone else made the calendar. You can’t edit anything in a calendar that you subscribed to. Sure, you can change up the name, colors, or alerts but you can’t actually alter the events. You can only change the events that you created.
- You were invited to the event. Just like we said before, you can’t change details for events you’re invited to. The only thing you can change is your attendance and alerts for that event.
- You’re using the wrong email. You might be using an email in your calendar that isn’t actually in your Contacts card. So, open Contacts, find your card and make sure all our emails are listed.
- You’re trying to change someone’s birthday. A cool trick Apple Calendar does is that it automatically makes a Birthday Calendar. So, you cannot change people’s birthdays from the calendar. You can only change them from your Contacts. So, head to your Contacts, find the person you want and edit their birthday in their contact card.
- You’re trying to change the time zone. You actually can change the time zone. If you can’t, it’s most likely because you’ve turned off time zone support. So, open your Calendar > Preferences > Advanced. From there just turn on time zone support and you’re all set.
I Can’t See My Events.
If you can’t see your events, you’re in for a mess. Let’s clean it up.
- You’ve hidden the calendar from the view. You may have accidentally unchecked on of the colored boxes next to your calendar on the left-hand side of your screen. If it’s unchecked, none of the events in that calendar will show up. Check the box and your events will appear, just like magic.
- You’re trying to view an event you already declined. Apple Calendar gives you the option to not see events you’ve declined. But, if you can’t remember if you declined or not, all you have to do is click View from your menu and then hit Show Declined Events.
- Your time zone is wrong. If you have the wrong time zone, the event on your calendar will move to match the specific time zone that is set. To fix this, open Calendar > Preferences and set your time zone to the correct one.
I’m Not Getting Alerts.
What would we do without alerts? Probably get ourselves into trouble. So, let’s fix this.
- Check your calendar preferences. Go to Calendar > Preferences and hit Alerts. Make sure the box is checked for Show shared calendar messages in Notification Center. Just to make sure, also check the box for Show invitation messages in Notification Center.
- Make sure Do Not Disturb is off. A nice feature Apple gives you is a Do Not Disturb feature that you can switch on at any time of the day. If it’s turned on, all of your alerts and notifications will be silenced. To change this open your Apple Menu > System Preferences. Choose Notifications and switch Do Not Disturb to off. But don’t leave the system preferences just yet. Also, click on Calendar and make sure the Alert Style is either set to Banners or Alerts. If you don’t have it set to either of those, you won’t get any alerts or notifications.
- Double-check the specific event. Go to the event that you missed the alerts for, click on it, scroll down to Alerts and make sure you set one. If you didn’t set an alert it makes sense you didn’t get one.
- Set up your email. You have the option to get alerts via email rather than notifications. But, if you don’t have the right email address, that can be a problem. Open Contacts, find your contact card and make sure the right email address you want is checked. If it’s not there, just add it.
My Invitees Aren’t Getting Invitations.
Of course, people want to come to your party, they may just have never even gotten the invite. Otherwise, they’re just lazy.
- Check the emails in your contacts. If the emails you have for the people you invite are wrong, then all the invites are just going to the wrong email. Go to your Contact and make sure they are right. Also, make sure your own email is right in your contact card as well.
- Refresh everything. Sometimes there can be a mishap in Apple Calendar updating changes and edits you make. It would be good to refresh your calendars to update the changes you made. Open the View menu and hit Refresh Calendars.
Wrap Up
Apple Calendar isn’t just a calendar, it’s like your personal assistant that always keeps you prepared. Being prepared builds your confidence and reduces your stress. Say thank you to Apple Calendar but also, give yourself a pat on the back because you came to the right place. Remember you’re not just staying on track, you’re ahead of the game. So guess what? Game on.