Yahoo Calendar isn’t used by most people, but it still has some unique features you can learn from. Being one of the largest calendar providers, Yahoo is still here serving millions of users, making all of their lives as seamless as possible. We are going to teach you how to give your productivity a major boost with Yahoo Calendar. Full of shortcuts, handy tools, and tricks, we’ll show you how Yahoo Calendar can manage your deadlines and various responsibilities. Not only will you be more organized, but you will be able to reach more short and long-term goals.
The Very Beginning
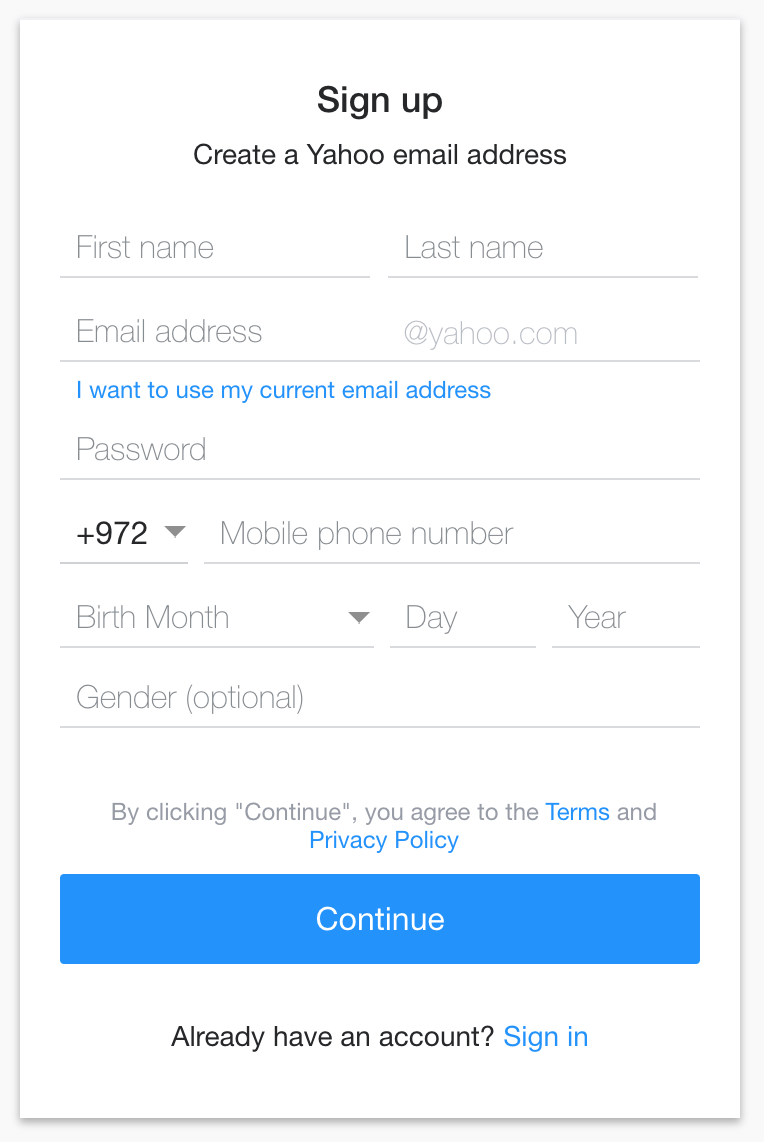
With Yahoo Calendar, you can share your events and personalize your calendar to your liking. Want to throw a party or schedule a meeting? Easily invite people and access the best possible time slots so everyone can come. Add your favorite holidays, follow the best sports teams. Even add your friend’s calendars, or simply calendars you are interested in that you can find online. Because Yahoo is a bit more exclusive than others, you’ll need a Yahoo account to begin.
Your Original Calendar Matters
You probably have a calendar you have been using before coming to Yahoo. Don’t throw it away! There’s no need to start from square one. We’re going to show you how to export and import your original calendar data so you can put it all in your Yahoo Calendar.
Exporting From Google Calendar
- Go to your settings
- Select Import & Export
- Click Export at the bottom of the page
- Save the zipped calendar in iCal format on your computer
Importing Steps:
- Go back to Yahoo
- Click the drop-down arrow next to My Calendars
- Select Import
- Click on choose file and voila! Yahoo brings everything from one place to another.
Exporting From Apple Calendar
- Open your iCloud calendar on your computer and
- Click on the broadcast icon on the right side of the calendar names
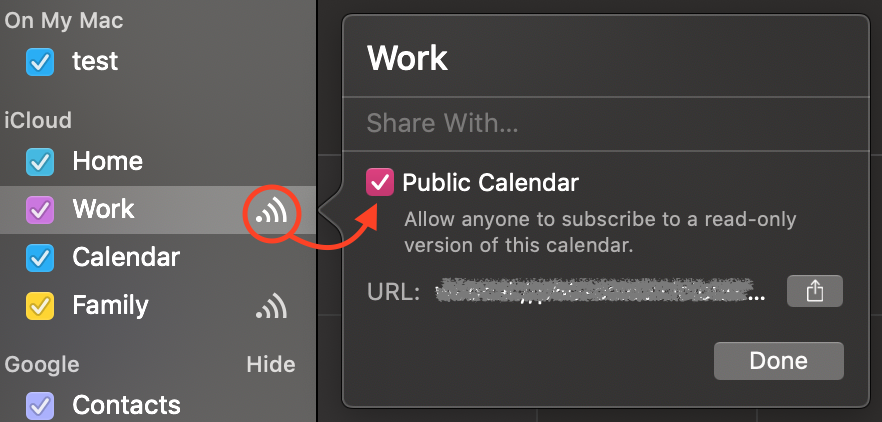
- Check the Public Calendar box
- Copy the link it provides you and then head back to your Yahoo Calendar
Importing Steps:
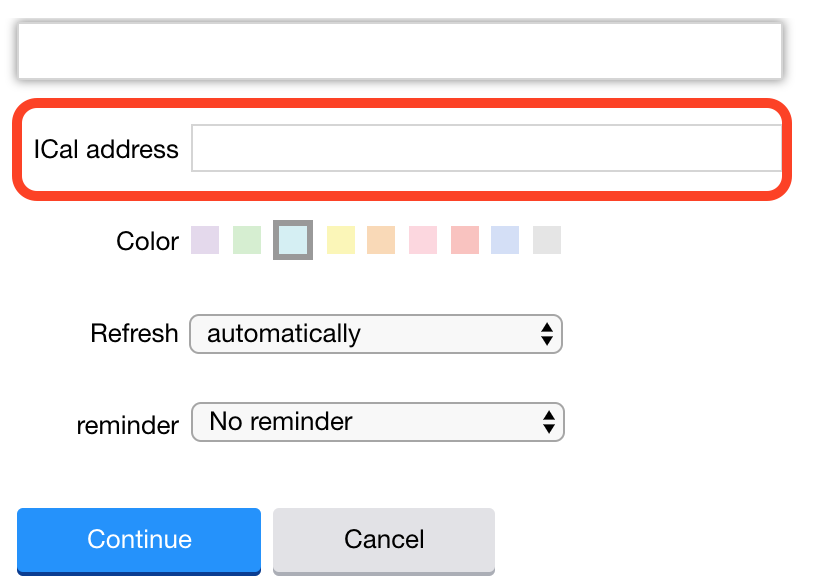
- Go back to Yahoo
- Click on the settings icon for Actions at the top of your screen
- In the drop-down menu, select Follow Other Calendars
- Paste your special link into the iCal Address
- Choose a name, color, how often you want your calendar to refresh and set the conditions for your reminders.
Personalize to the Max
This isn’t just an ordinary calendar. It’s your calendar, so you can personalize it entirely to your liking. Head back over to the left side of your screen, click the drop-down arrow. Get to know where the drop-down arrow is located. It will appear when you hover your mouse next to your calendar of choice.
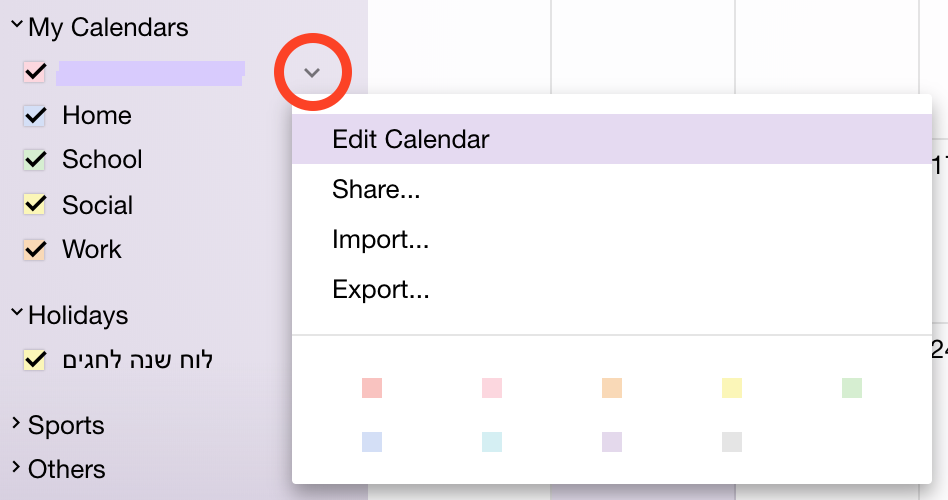
Your arrow offers you quite a few options and you can pick your color of choice right from there. The colors only apply to your calendar events, not your calendar background. Click on Edit Calendar to see what else you are able to change.
Change the name, color of your events (yes, you can do this from here, too), and your sharing settings for your calendar. You want to share your calendar, you say? Let’s do it!
Sharing Is Caring
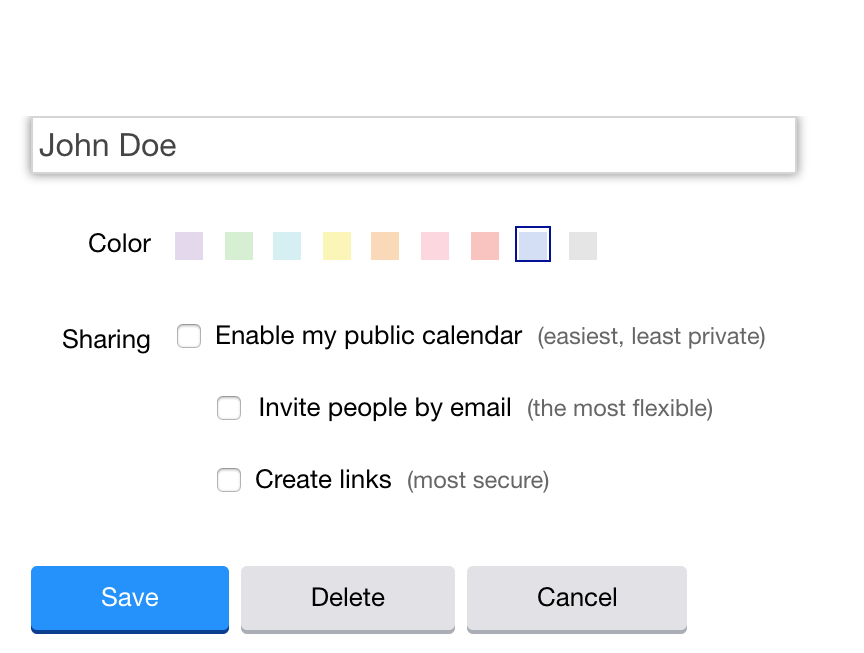
When you click on your sharing options from the drop-down arrow, you will be given three different ways to share your calendar.
Enable My Public Calendar
Keep in mind, this option lets anyone can see your schedule. It will provide you with a public link that you can send to others. If someone knows your Yahoo username all they have to do is add that to the end of the template calendar link: https://calendar.yahoo.com/. You can adjust the publicity in three ways.
- View events: anyone with your email will see your entire schedule,
- View titles and locations only: anyone with your email can see what you’re doing, when and where, or
- View free/busy times: anyone with our email will only see when you’re available. Unless you want to share your schedule with the world, you probably won’t be making your schedule that public.

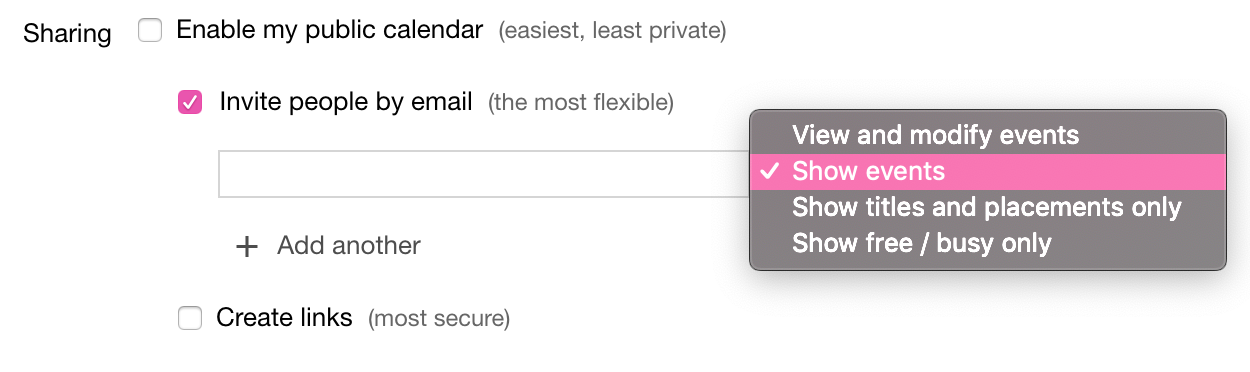
Invite People By Email
- Check that box
- Type in the emails of the people you want to share your calendar with
- Hit enter and save once you add people
- Your recipients get an email right away with a link to your calendar
You have a new option to let people view and change events, which gives them a lot more control over your calendar.
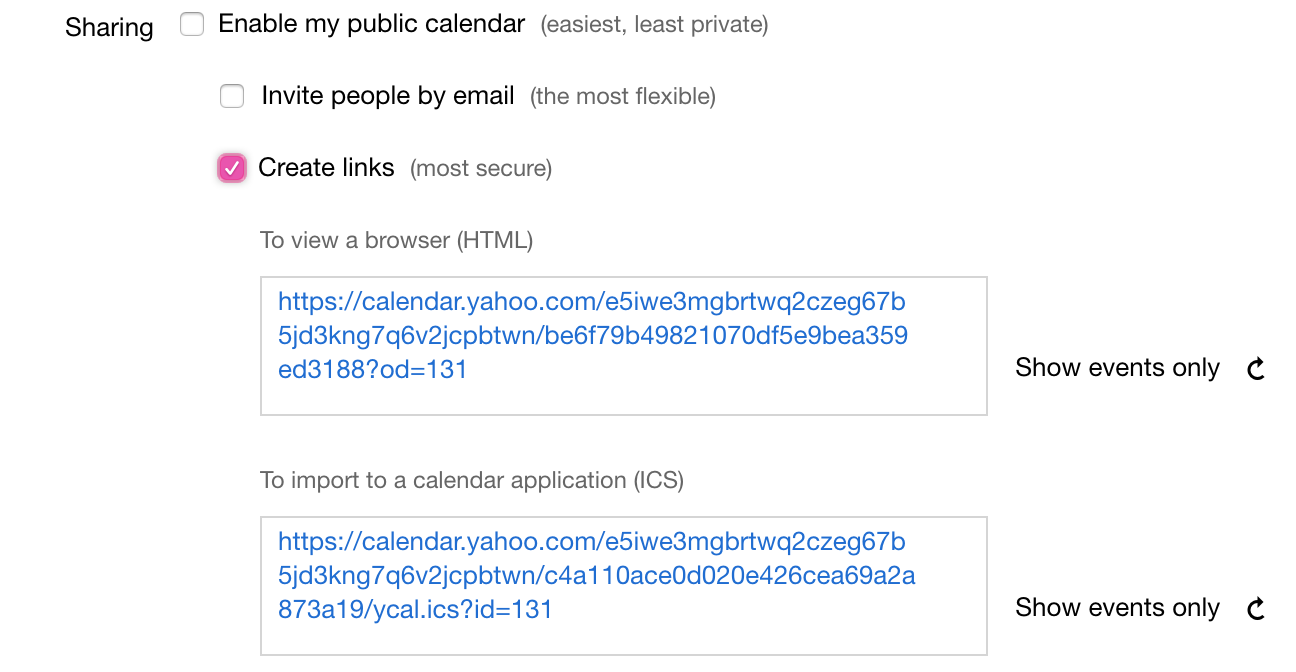
Create Links
Click the checkbox and you’ll see to URLs that pop up. Yahoo will give you two links. The first one (HTML), you can send someone to look at your calendar in a browser. The other one (ICS), you send to someone who wants to import your schedule into their own calendar. Both of these only give access to the person you send it to and they aren’t able to change anything on your calendar. Click the refresh buttons to reset the URL for our shared calendar. Note: once you refresh the links, the previous links won’t work.
Revoking Sharing Access
Here are a few simple ways to make your calendar private again.
- Under Create Links, click the refresh button next to those links
- If you’ve chosen Enable My Public Calendar, just uncheck the box.
- If you’ve invited people by email:
-
- Head back to the Edit Calendar menu
- Go to invite people by email – next to each person you invited will be a minus sign “-“
- Press on the minus sign
- Hit save and now you don’t have to share anymore
Changing Your View
Seeing your calendar the same way every day can get a little boring. So, don’t be afraid to change things up a little. All you have to do is go to the menu bar at the top of your calendar:

Click on Day and it will show your calendar for a specific day, Week shows the week you’re in, Month shows your current month and so on. List, however, gets rid of all the days and will only show you a list of events that have been added to your calendar.
Alter Your Week
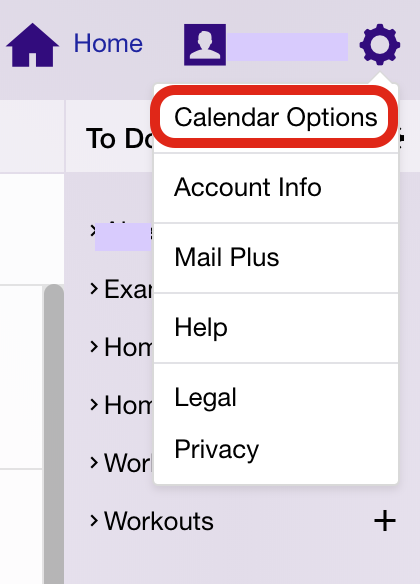
Changing up the appearance of your calendar is easy. You’d think it would be just as easy to switch up your preferences for your weeks like when they start, how long your days last, etc. However, you can’t make those changes from your handy navigation bar. You may have already noticed your Yahoo calendar has quite a few setting icons laying around. There’s one at the top right corner. Click on that and select Calendar Options.
You’ll be brought to the first page labeled General where you several ways to change your calendar preferences such as when your week starts, when your day begins and ends, time zone and an option to automatically add incoming invites to your calendar.
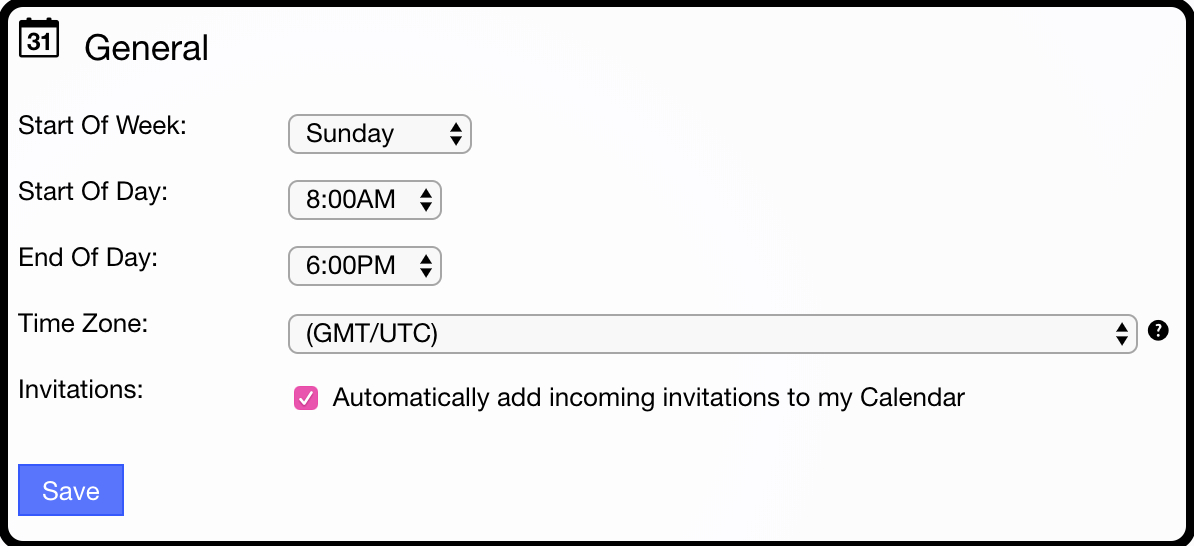
Beginning Your Weeks
Other calendars usually only let you start your week on Saturday, Sunday or Monday. Well, with Yahoo you can choose any day to start your week. Go crazy. Press save and you can set your week is set!
Starting Your Days
- Click the drop-down menu next to Start of Day or End of Day
- Choose the hours for those sections
Keep in mind, you will only see the start and end time changes when you’re in your Day view, so you won’t see the difference when you are in the month view.
Time Zone
Setting your time zone is pretty important. You don’t want to accidentally be set to a time zone 5 hours ahead and have your workday start at 2:00 in the afternoon (that would be nice, though). Your calendar should automatically set your time zone based on your location but it may not always happen. For instance, if you’ve been using a VPN or you’re on a road trip, a plane or spaceship, your time zone may fail to update. So, double-check it’s correct back in your settings icon.
Adding Invites
As we mentioned before, you have the choice to have your incoming invitations automatically added to your calendar. Here’s the catch: every, single invitation is added.
Even if you don’t want to go to these events, they will still show up on your calendar, which can quickly create clutter. Sure, you might want to see the invite for the party this weekend, but you might not want all the invites for your Grandma’s weekly bridge games popping up all the time. So, you might just be better off adding your invites to your calendar by yourself.
Right now you have one calendar, who says you can’t have more?
More Than Just One Calendar
We know you are going to have schedules for multiple things: work, school, social life, home, etc. Even outside of those basics, some of us still have more schedules we need to keep track of. Note: These schedules are also referred to as “calendars.” It can be a little confusing, but if you think of them as mini-calendars inside one big one it makes it seem a bit more simple!
So, basically, you can have individual schedules for almost anything you want and we recommend you do. You probably don’t want your child’s soccer games inside your work schedule, you’d want that in one of its own. To keep your organization at its peak, it’s best to implement these different schedules.
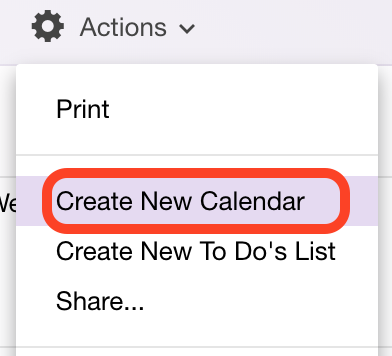
Creating Your Own Calendar
- Go to the setting icon for Actions
- Click on Create New Calendar
Another way to add another calendar is simply by pressing the plus button next to My Calendars on the left side of your screen. Either way you do it, this small pop-up will appear:
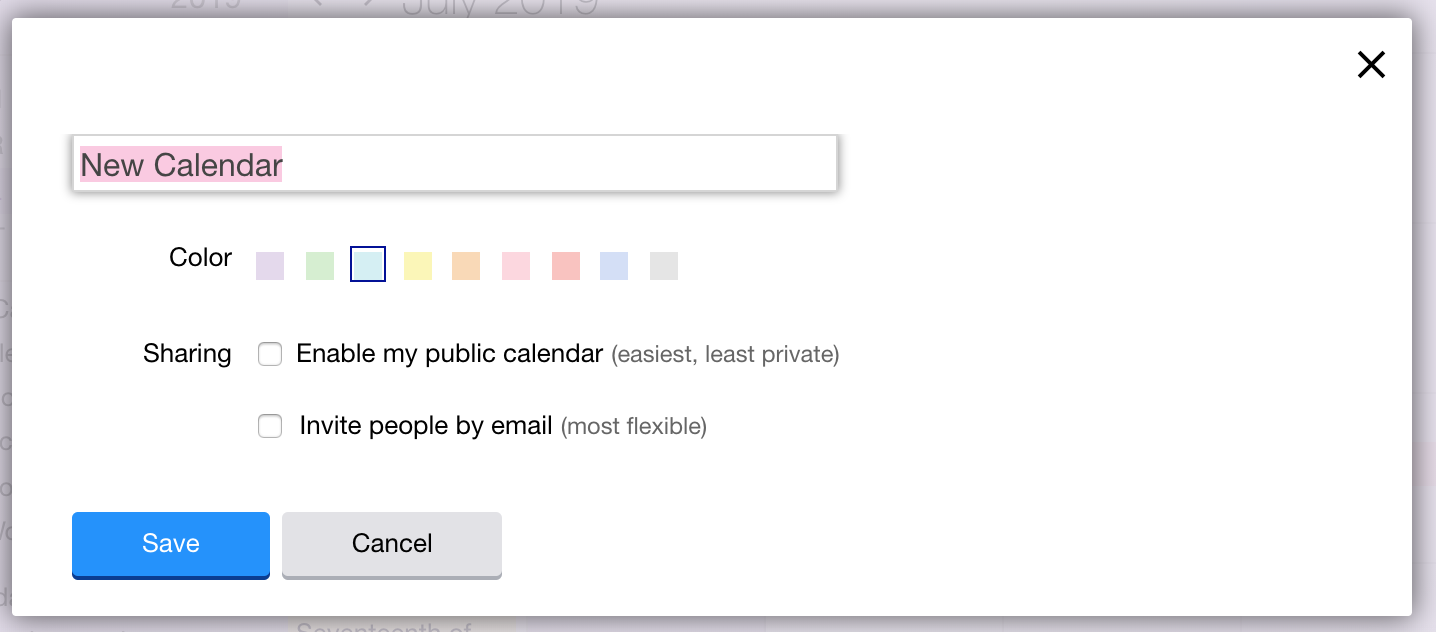
Enter a title, background color for events and edit your sharing settings: completely public or inviting people by email. If you want to create a URL to share with other people, you need to create the calendar first.
- Then go to your new calendar on the left side under My Calendars
- Click on the drop-down arrow
- Click Edit Calendar or Share
- Choose Generate Links and your links will appear
It doesn’t end there, not only can you create your own calendars but you can also add calendars made by other people.
Adding Other Calendars
As you know, the left side of your screen is where you will always find the list of the calendars you have, whether it’s the ones you’ve created or the ones you’ve added from other people.
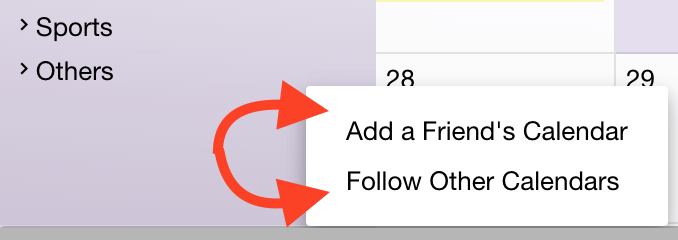
- Go to Others at the bottom of your calendar list
- Click on the settings icon
- Choose to Add a Friend’s Calendar or Follow Other Calendars
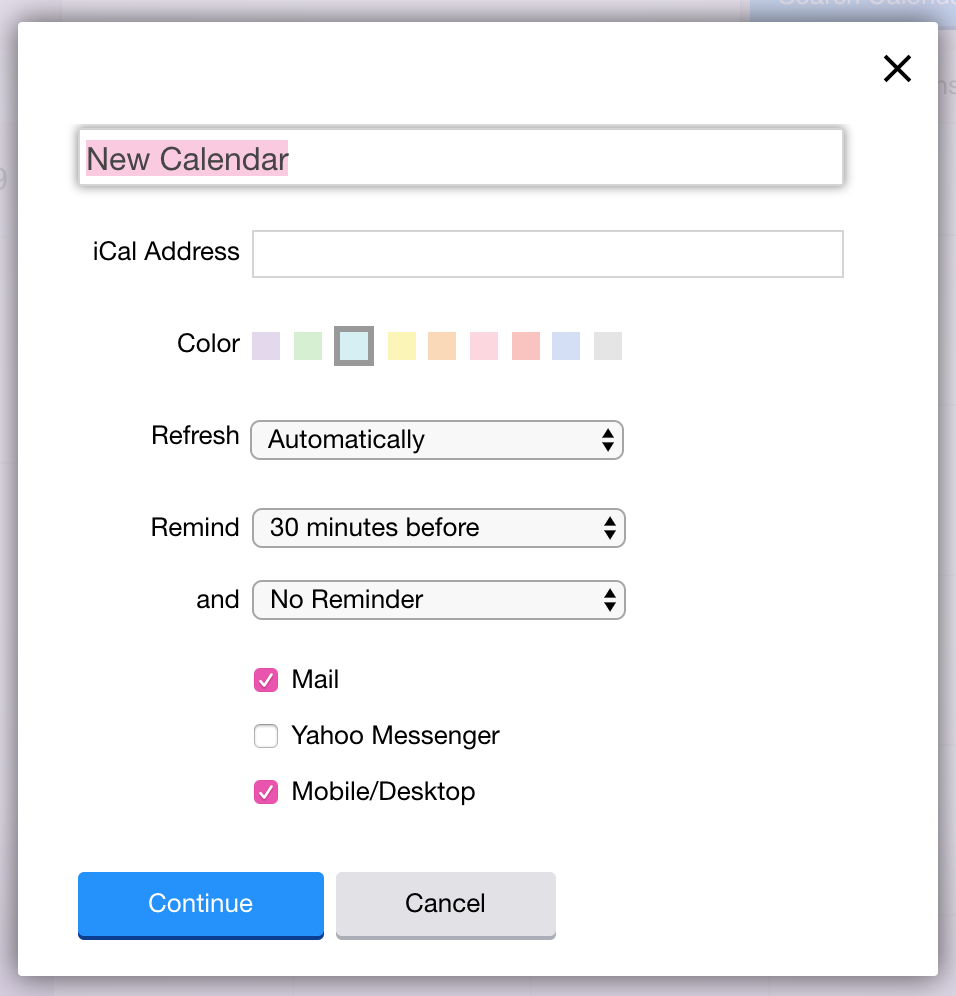
- Add a Friend’s Calendar and you’ll type in their email address
- Follow Other Calendars and copy and paste the link for the calendar you want into iCal Address.
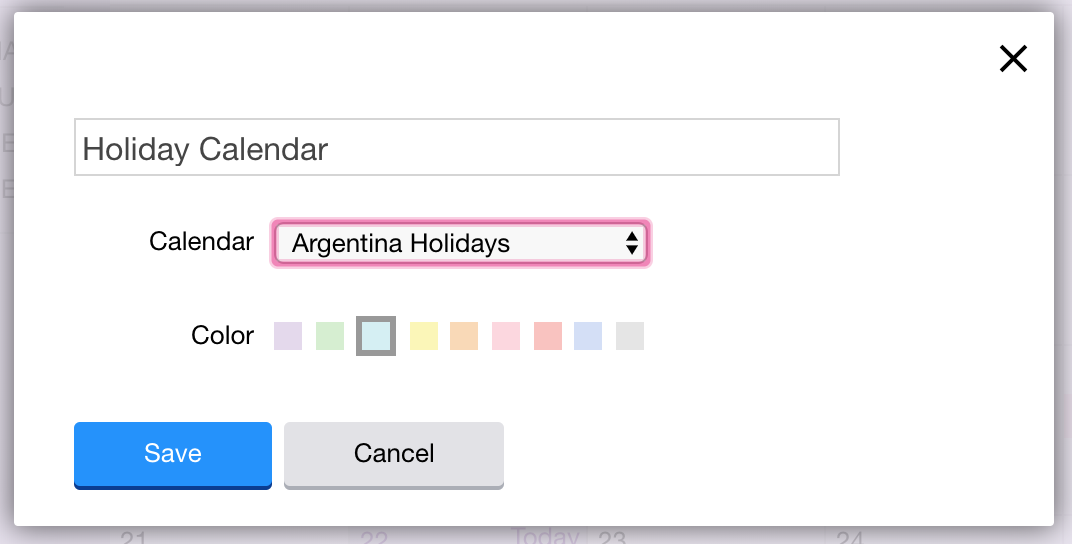
For whatever option you choose, you will be directed to a mini-menu where you will fill in your preferred settings for that calendar that looks like this:
Adding Holiday Calendars
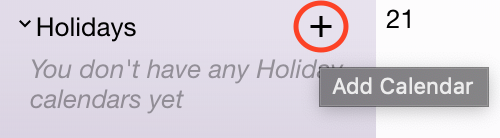
- Hover your mouse over Holidays
- Click on the plus button
- Create a name in the mini-menu pop-up
- Choose what holidays you want to follow and pick a color.
- It will give you a list of national and religious holidays. Choose what you want and then press save.
Adding Sports Calendars
- Hover your mouse over the Sports Calendars
- Click on the settings icon
- A pop-up menu will appear that will give you a bunch of recommendations of various sports teams.
You also have the option to search your team of choice in the search bar or look through the Trending section where you can add upcoming games to your calendar.
- Click on the plus button for the team you want to do add. If your calendar starts to clog and you want to get rid of some of the sports calendars, all you have to do is bring up the icon next to it and hit Unfollow.
However, it’s important to note that this feature is typically not used. More often than not, people run into trouble with this feature not working at all whether the calendars don’t show up, certain things do not load, etc.
Subscribe to Calendars
Think of almost any kind of calendar you want to follow, and there’s most likely a link for it online, which is all you need. Any calendars you want to add need to be in iCal format. A really nice resource to use is iCalShare, which has tons of free calendars ranging from local events in your area to an eclipse calendar. Another fun place to look for more calendars is at CalendarLabs.
Too Much Clutter? Delete Your Calendars
Of course, keeping track of so many things can still become overwhelming even with Yahoo Calendar. The first way to get rid of some calendars is to uncheck the colored box next to the calendar you want to remove. You will still be following these calendars, they will just be hidden from your calendar, clearing up some space for the more important stuff. So, if you want to see it again, just check the box again.
Another way to get rid of a calendar is to hit the drop-down arrow next to the calendar and select Unfollow. This will actually remove it permanently. Now your calendar is clutter-free!
Adding, Editing & Removing Events
So, we’ve told you how to set everything up. It’s time to get to what matters most: adding, editing and removing events. We all know things in our schedules are bound to change no matter how hard we try to keep them consistent. So, being able to change your events and all the details is important.
Adding Events
For some reason, adding an event isn’t an option underneath your Actions setting icon. It has its own place at the top left corner of your screen underneath the Yahoo! Mail icon labeled New Event, which is the first way to add an event. This is the easiest way to add an event, but don’t be fooled, it’s not the quickest.

Click on New Event and a pop-up menu will appear with a form for you to fill out. Give your event a title.
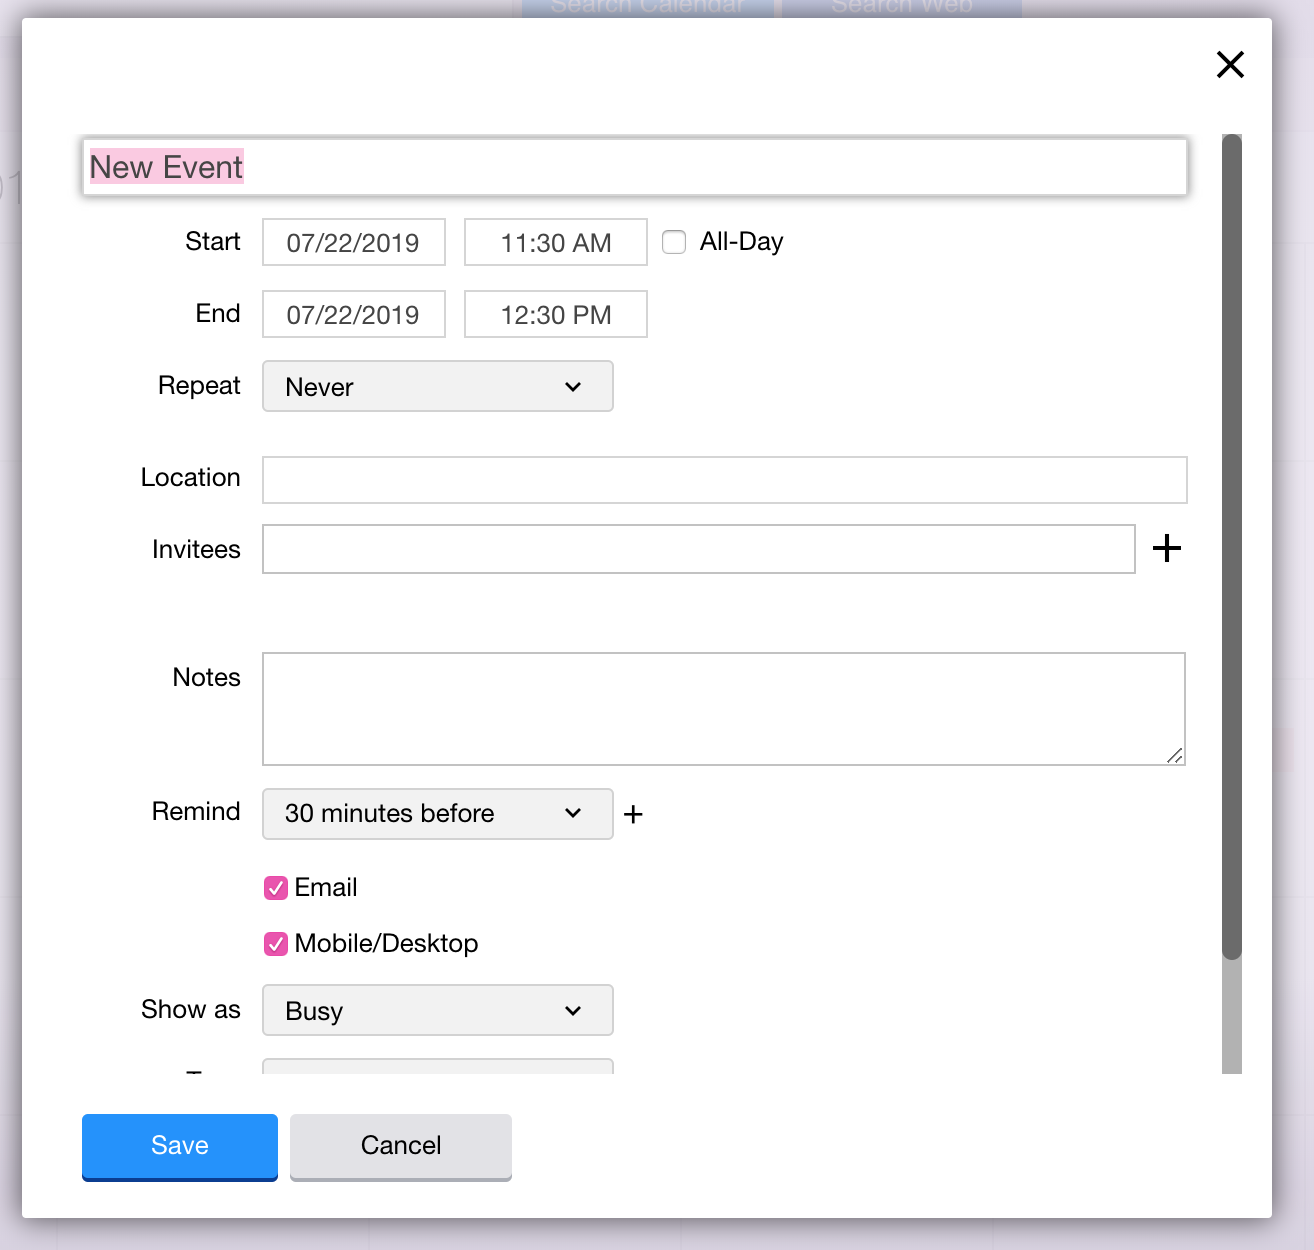
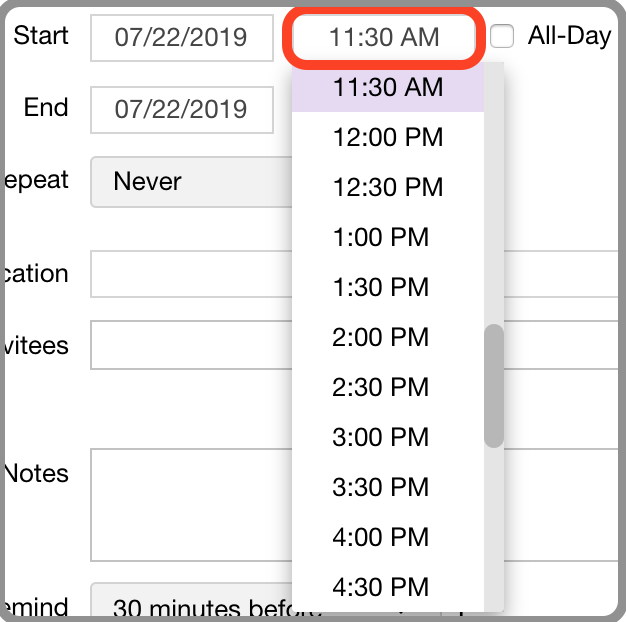
Setting the Date and Time
The next step is to set a start time for your event. By default, the event will be on just the day you create it on and it will last for an hour.
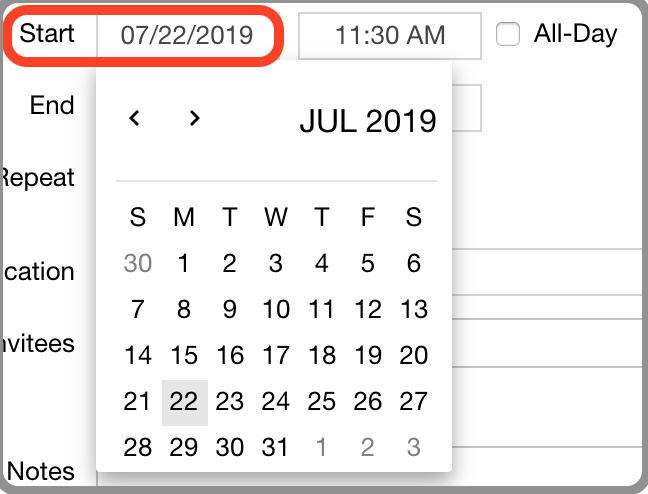
- Click on the dates
- A mini-month view will pop up where you can set the beginning and ending dates.
Click on the time to adjust the hours. If you want the event to last all day, check the box next to All day.
Repeating Events
The next option is if you want this event to repeat or not. Yahoo automatically sets it so it never repeats. You have your regular repeat options like daily, weekly, monthly and yearly.
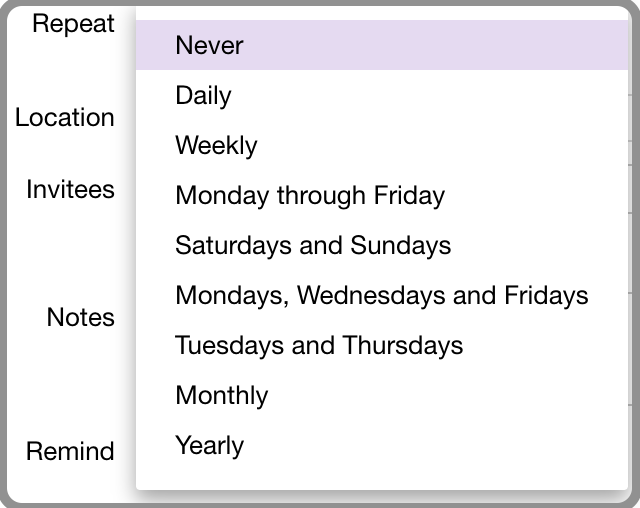
The other ones you may not have thought of are repeating daily between Monday – Friday, just Saturdays and Sundays, only on Mondays, Wednesdays and Fridays and your last option is to repeat on Tuesdays and Thursdays. If your book club meets every Monday and Thursday, you might need to reschedule or stay home to catch up on Netflix.
Setting a Location
The next step is to pick a location for your event. Unlike some other calendar applications, Yahoo will not pull up an address for you as you type in a location, it attempts to, but the link most likely will not. You are much better off manually typing in the address.
Adding Invitees
Now it’s time to add invitees. You will see Invitations with a bar where you will type in the email addresses of those you wish to invite. If those people are already in your contact list, Yahoo will autocomplete what you are typing. Click on the plus button and it will pull up your contact list. Scroll through and add invitees from there, too.

Click on Check Availability to see who is able to attend your event as long as they are sharing their calendar with you.
- There will be an icon on the horizontal schedule that lets you adjust the time of the event to pick one that fits best for everyone. You can also use your friendly arrows to go through different days
Adding Notes
Next, you have the option to add notes about your event. Surprisingly, this section is pretty big so you can go into much detail as you want. If you write a paragraph, it might not just be a note anymore. Try and keep these to a minimum so seeing them in your schedule is easier.
Reminders
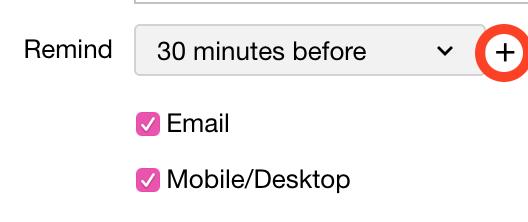
- Click the drop-down menu
- Choose when you want to be reminded
To add a second reminder…
- Click the plus button
- Set the desired reminder amount
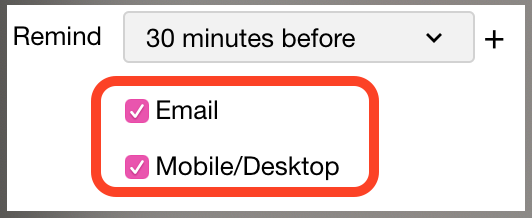
- Make sure you choose how you want to be reminded.
- You have two options: email and/or mobile/desktop. The email option has a small catch: it will only send the reminder to your Yahoo email address so make sure you are checking the right email.
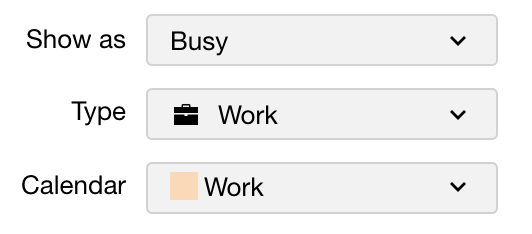
Show As
- Choose how you want your schedule to appear to others for this event: busy, free or tentative.

- Choose what type of event you’re making. Yahoo will automatically set this as General but if you click on the drop-down menu, you’ll be given multiple other options.
- Lastly, choose what calendar this event is for.
Shortcuts
Did we grab your attention?
- Click on any day you want on your calendar.
- The pop-up you get depends on what view you are already in. If you’re in the daily or weekly view, wherever you click will be on the hour of the day and you’ll be entering an event into that time. In the monthly view, a small pop-up will appear showing the entire day like this:
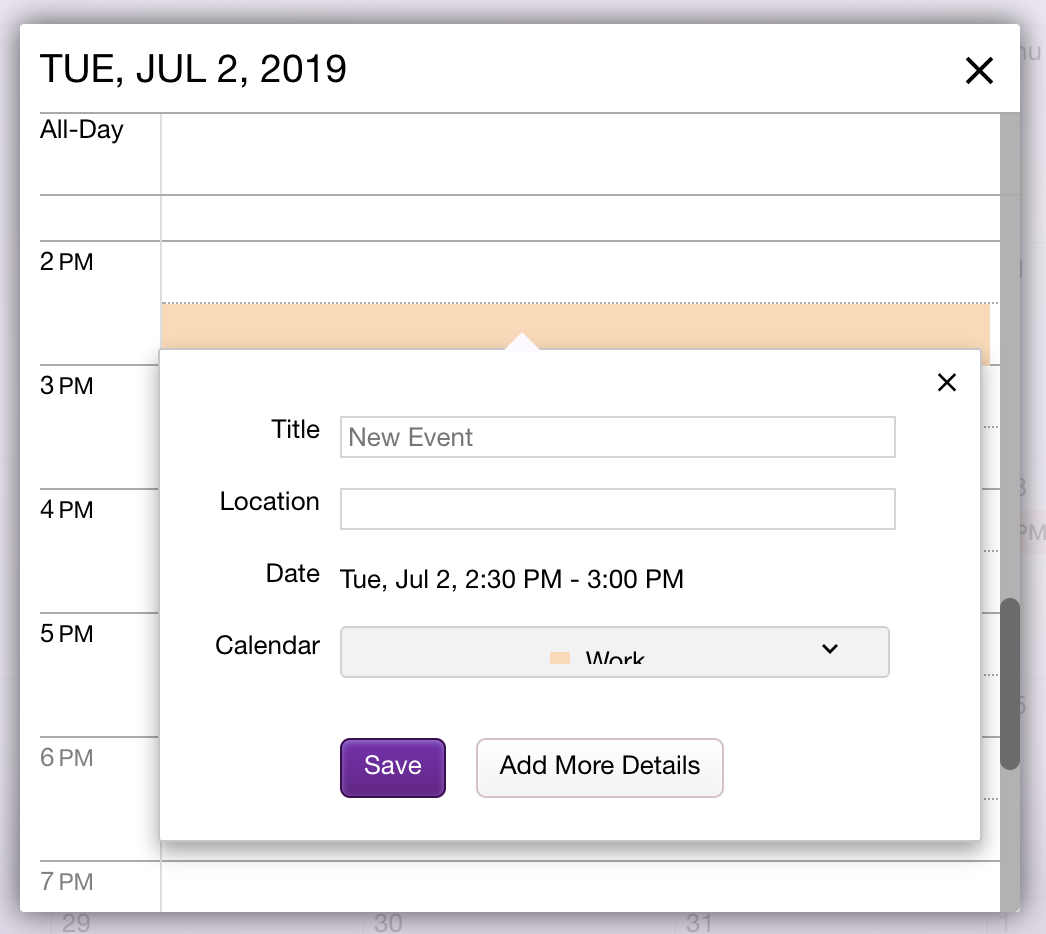
- Click on the time of day for your event (another pop-up will show, allowing you to enter in more details).
- Type in a title and location. Your date will already be set to the day you clicked on originally, so if you want to change the time, just click on a different time during that day.
- Choose the calendar you want the event under and that’s it!
Want to add all the fun extras?
- Right-click on your newly created event and
- Click on edit to add more details.
Changing and Deleting Events
After you create an event, getting rid of it or changing it to the way you like is pretty easy. All you have to do is right-click on an event and Yahoo gives you several options to choose from.
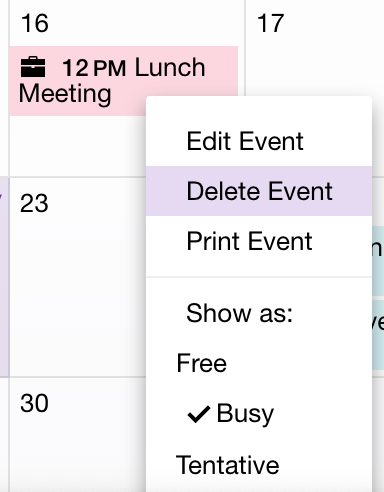
Here you can edit, delete, or even print the event if you really want to. The next three options are for how your event will appear to others you share your calendar: free, busy, or tentative.
Now you know how to do the most important functions for your calendar: to add events, change them up or get rid of them if you need to. Remember there is not just one place to do all these functions. It can be a bit confusing so make sure you play around with it a little to make sure you get comfortable with it, but also, have fun with it!
Yahoo’s To-Do List
Yes, Yahoo offers you a To-Do list, even though it’s not nearly as good as Any.do of course.
If you don’t want the To-Do list displayed on the side of your screen since you’re probably using Any.do…
- Go back to the settings icon for Actions
- Select Hide To-Dos.
Making Your To-Do List
The new age of digital calendars gives you a lot of flexibility in the functions they offer. You can easily move events around if they need to be rescheduled, add more than just one reminder in case you’re forgetful, invite people to events and more. Usually, there is something more to a digital calendar than the basics. With Yahoo, that’s their handy To-Do list. Giving you the option to be even more organized, let’s check it out.
Creating Lists
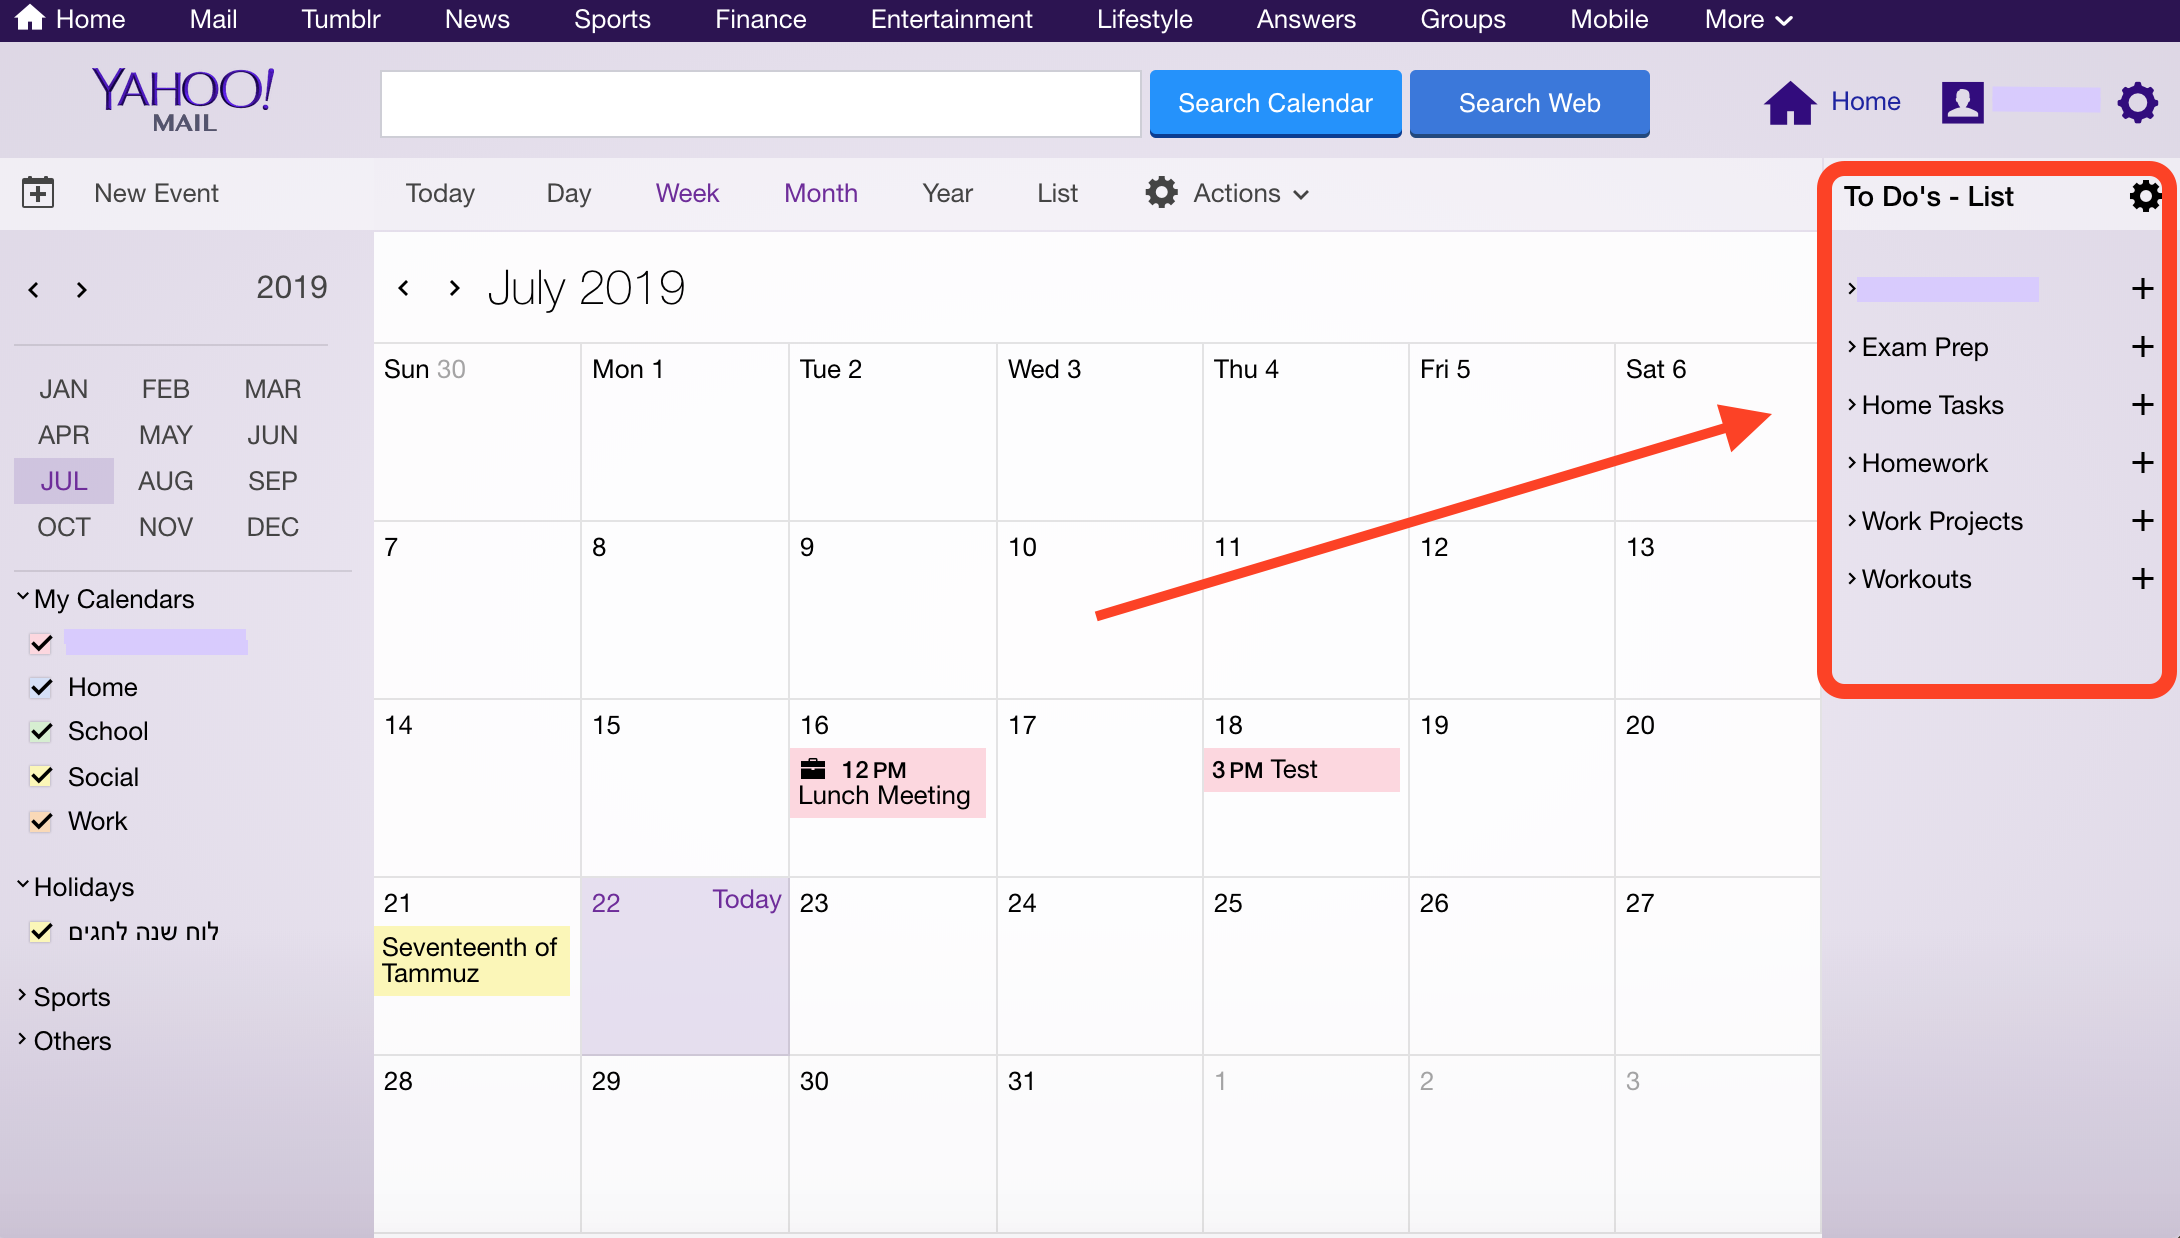
Your To-Do list will always be on the right side of your screen. If you don’t see it, you can easily make it magically appear with two simple steps.
- Go to the settings icon by Actions
- Select Show To-Dos – your To-Do list comes with its very own settings icon that brings up a menu of functions.
It’s time to learn! Don’t stop reading there, though. We can predict the future and promise this will come in handy in your near future. To maximize your organization, the To-Do list can be viewed in a variety of ways.
- Priority View lists all your tasks based on what is most important to least.
- List View orders your tasks by the subject categories you’ve placed them in.
- Due Date View puts your tasks in order based on when they are due.
- Done View shows you everything you’ve completed.
Let’s not get too ahead of ourselves. We need to organize your To-Do list before we add tasks. So, go back to that settings icon and click on List View. This is going to create a heading, which you can categorize your tasks with.
- Go back to the settings icon
- Click Create List.
- Name the list and choose if you’d like to share this list (you can adjust the sharing settings and either let people view and edit the list, or just let them view only)
- Press Save and you’re list will appear when you are looking at your To-Do list in List View.
Adding To-Dos
So, you can organize by your lists but don’t forget you can organize by priority or by due dates! Furthermore, you have more than one way to add a task.
- Head back to that settings icon
- Click on New To-Do and a pop-up will appear like so:

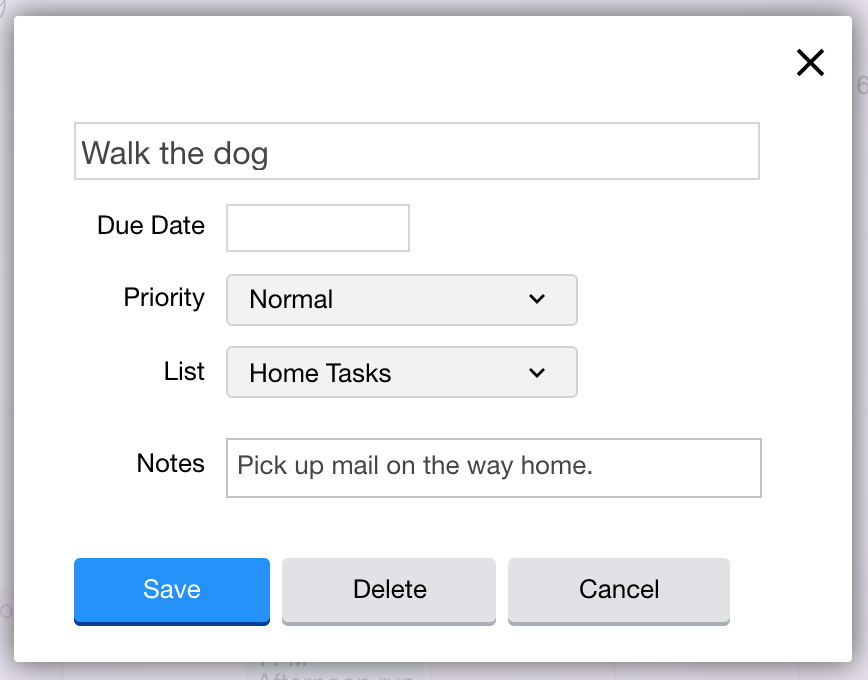
The first thing you’ll do is give it a name, set a due date and rank the priority for that task: normal, important, or if you’ve waited until the night before to start a project, rank that as urgent. We’ve prepared you for this next step: choose the list you want your task to be under, otherwise, the default is to place the task under the calendar you created. Add any additional notes, click Save and your task is set!
Task Shortcuts
Bet you didn’t think there would be more shortcuts coming your way! These shortcuts come in handy when you don’t need to fill out all the fields for the task you want to make, like walking your dog. You really don’t need to add notes or set a due date for walking your dog. It’s simple enough.
- Click the drop-down arrow on the left side of your list title
- Hover your mouse at the end of the list of tasks (a field will appear saying Add To Do)
- Enter your task into that field
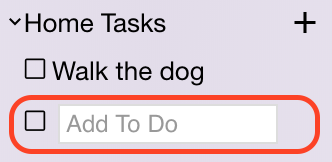
Keep in mind, when you use this easy method, you aren’t setting any due dates so this task will not show up in your Due Date View. The same goes for Priority View, in case you have something urgent. But, is walking your dog really that urgent? If you want to add due dates, priorities, and notes, you’ll need to edit that task.
Editing Tasks
So, you quickly added the task to walk your dog but you forgot to add a note to pick up an important piece of mail on the way home. No problem. Click on that task and you’ll see a small pop-up that gives you two options: Edit or Delete.
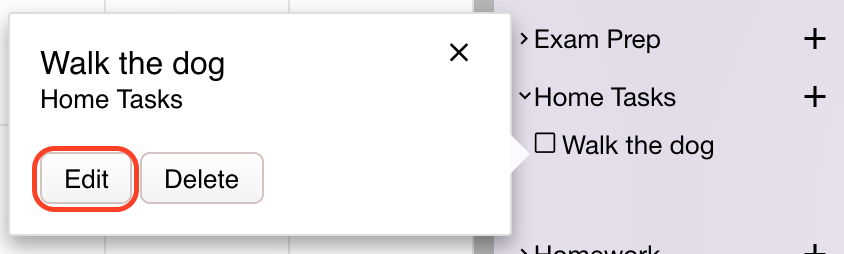
Click on Edit and the detailed menu will pop-up for you to fill out, where you can change the title, category, notes and add a due date if you’d like.
If you’re feeling like this isn’t easy enough, you can also click and drag your task from one specific category to another! Such as moving something from important to urgent or from your homework list to your worklist. But, if you want to edit it, you need to click on that specific task.
Sharing Tasks
Sharing your tasks from your To-Do list is pretty basic. No, you can’t assign tasks to people and you can’t even share the tasks themselves. The only way you can share anything on your To-Do list is by…
- Opening your tasks in List View
- Click the settings icon
- Press Share
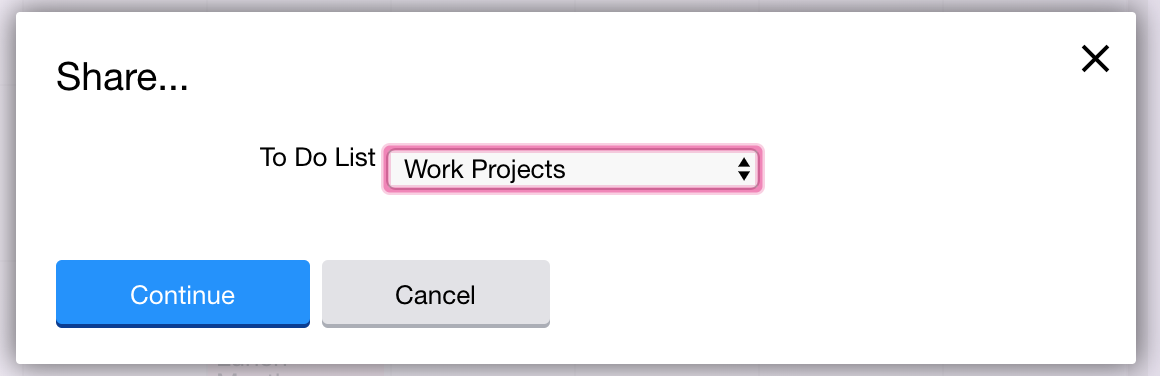
Make sure you choose the right To-Do list for whoever you’re sharing with. You probably don’t want to share your chores at home with your boss.
Yahoo Calendar on Your Phone
So, it’s time to face the facts. Yahoo Calendar does not offer a mobile calendar app to make your life seamless, like Apple and Google. You’d think you could just type in the link calendar.yahoo.com in your browser on your phone, but that won’t even work. You’ll just be redirected to m.calendar.yahoo.com, which is the page you see when you open it on your desktop, so using it from your phone on a browser is nearly impossible.
Trick or treat? We choose tricks. That’s exactly what we’re going to do so we can get your calendar on your phone. And that’s going to be syncing your Yahoo Calendar with the calendars that come with your mobile device, either Google or Apple Calendar.
Yahoo Calendar for iPhones
This process is a few steps but it’s definitely worth it if you want your Yahoo Calendar on your iPhone.
- Head to your iPhone Settings
- Select Passwords & Accounts
- Click on Add Account.
- Click on Other (at the bottom)
Here’s where your trick comes in to play. Click on Add CalDav Account and you will need to fill out four fields.
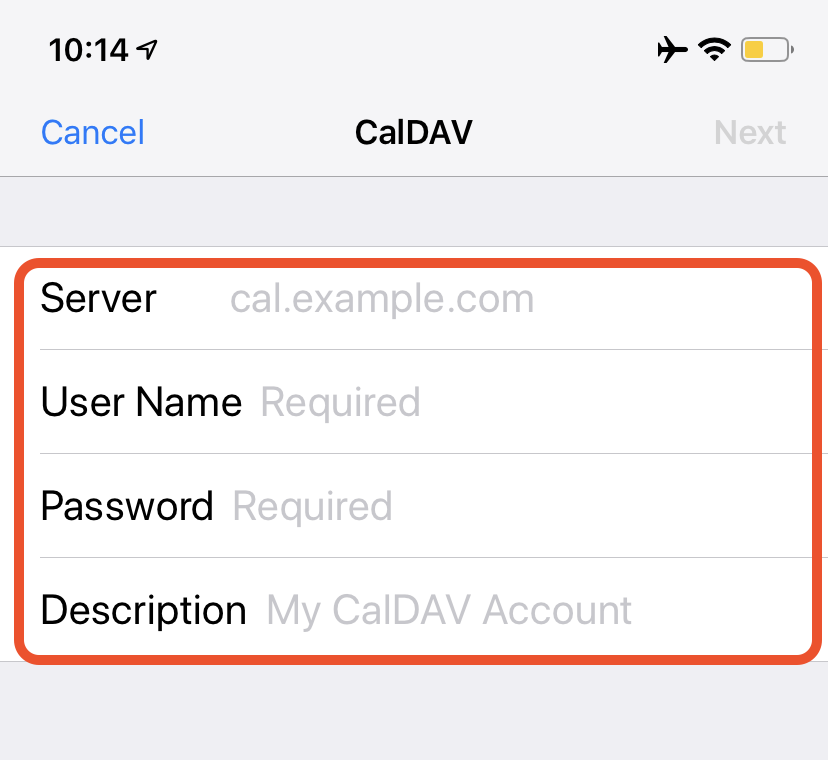
- For Server, type in calendar.yahoo.com.
- In the User Name and Password fields, type in your regular Yahoo Calendar login.
- For the last field, Description, we suggest you type in Yahoo Calendar. You can use anything you want for the description, but be careful not to confuse yourself if you choose a funny name.
From there, you can probably figure the rest out. Press Next, confirm your account and save it. Now, when you open your iCloud calendar, and all of your Yahoo calendar events will appear on there, just like that!
Yahoo Calendar for Androids
Even though this process is for your phone, you’re actually not going to use your phone at all, just your computer. Open your Yahoo Calendar and copy your iCal Address, which is a fancy name for the URL for your calendar.
- Go to the settings icon by Actions and click on share.
- Choose the calendar you want to “share” with yourself and click Continue. (Note: if you want to share more than one calendar you’re going to have to go through this process again).
- Click on Generate Links and here comes the trick for this one: copy the second link.
Now, here’s how you’re going to add that calendar to your Google Calendar. Open calendar.google.com, click on your friendly settings icon, click on Settings and click on Add Calendar > From URL.
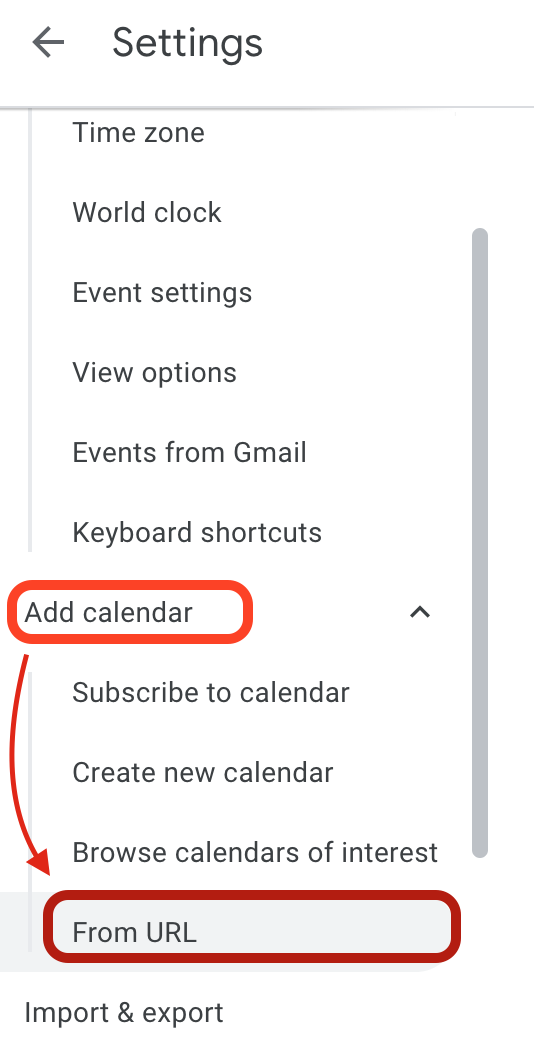
Paste that link you copied from your Yahoo Calendar and everything will appear, like magic. And you beat Yahoo to it, getting around the barriers is kind of fun, isn’t it? Your Google Calendar on your Android will have everything that you just added from your computer.
Conclusion
Throughout this article, we taught you what is most important for Yahoo Calendar: how to use it. We also showed you some nice tricks and shortcuts to make using Yahoo Calendar fun and seamless. Now that you know Yahoo Calendar like the back of your hand, you are able to organize everything just from the touch of your fingers.